 DVMP Pro can be used as a media player which is specialised for playing and processing files from a variety of video cameras and smartphones including DV, HDV, AVCHD formats; files from some HDD and DVD MPEG-2 based cameras; and also MOV and MP4 files from many cameras, smartphones and DSLRs. See Supported File Types for a comprehensive description of the supported file types.
This page describes the player functions of DVMP Pro - see the Tools and Batch Processing chapters for details of the operation of its set of tools.
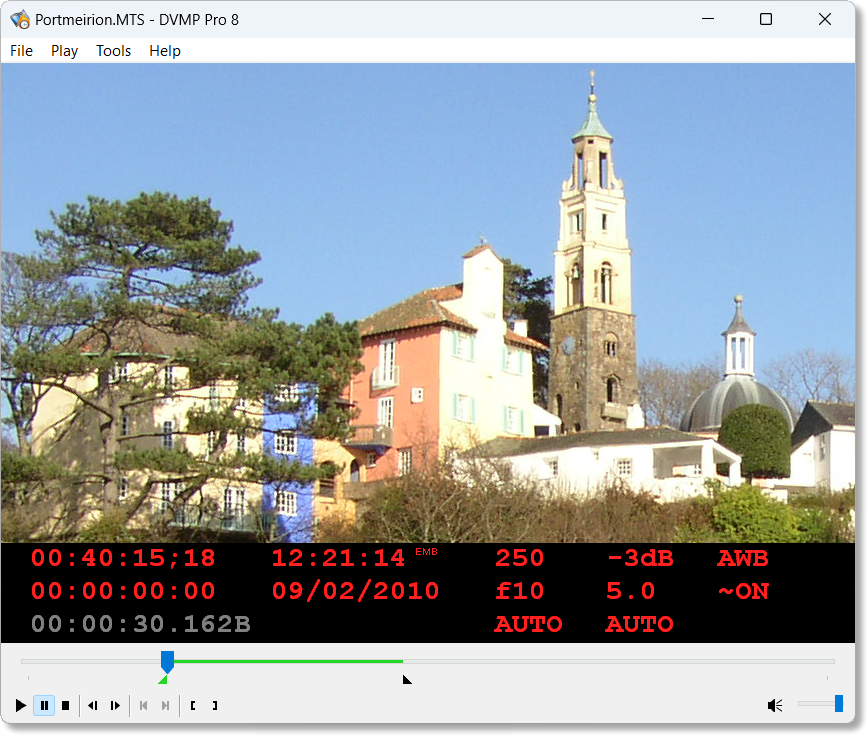
DVMP Pro plays the video files originating from compatible video cameras while simultaneously displaying the timecode, the date and time of recording, aperture, shutter speed, white balance and other camera settings that were recorded when the footage was being shot. This information is called Camera Metadata and DVMP Pro allows you to view it while playing or frame-stepping through the video. It also allows you to jump quickly between scenes in DV file types.
Displayed Metadata
As DVMP Pro plays a supported video file it simultaneously displays the following Metadata items with frame accuracy:
•Timecode
•User Bits
•Date and Time of Recording (sometimes referred to as datecode or datacode)
•Shutter speed
•Iris (f-stop)
•Exposure Mode
•Gain in dB
•Focus Distance in metres
•Focus Mode
•White Balance
•Image stabiliser on/off
•Audio details (DV file types only)
plus Latitude, Longitude, Altitude, Speed and Track for some Geotagging video cameras. See below for further details of Geotagging support.
Player Features
The player has the following features:
•Plays MOV and MP4 files from most cameras
•Plays DV, HDV and AVCHD file types
•Plays MPEG-2 Program Stream files from some cameras (standard definition Sony HDD/DVD and MOD)
•Mark In and Out points to set the start and end positions for Time Stamping and other tools
•Geotagging support - displays geographical location of recording (for GPS equipped cameras)
•Displays map of recording location (for GPS equipped cameras)
•Adjust the playback speed
•Rotate video to view it in portrait or landscape orientation
•Displays 4:3 and 16:9 (widescreen) format correctly
•View metadata in real time and frame-accurate
•Pause and frame-step forward or backward
•Jump forward or backward in 1 second or I-frame increments.
•Jump to next or previous scene (DV file types only)
•Drag and drop files onto DVMP Pro
•File properties dialog
The metadata information is displayed per frame and appears in real time beneath the video as it is playing. You can pause, step backward or forward a frame at a time and the metadata is displayed with frame accuracy. If you are playing a DV file you can also jump forward or backward between scenes. You can view the time and exposure settings used by the camera when the footage was shot, provided that these are stored by your camera model.
GPS Geotagging Support
Some video cameras have built-in GPS units which allow them to store the geographical location where each video clip was recorded - this is termed Geotagging. Usually there is a switch or menu setting on the camera which must be switched on for this Geotagging information to be stored as metadata.
For AVCHD files produced by such cameras, DVMP Pro can display the following Geotagging metadata:
•Latitude
•Longitude
•Altitude
•Speed
•Track
The last 2 items are the speed and direction of travel of the camera. Track is the direction that the camera is traveling, not the direction that the lens is pointed.
Some of these AVCHD cameras also have a standard definition mode. When set to this mode the camera usually stores video in standard definition MPEG-2 Program Stream files - for Sony models DVMP Pro can also play these files and display their Geotagging metadata.
Files created by Sony XAVC-S models which are equipped with a GPS device (like the HDR-AS100V action camera); and files created by GoPro Hero Black and Contour+ POV cameras can also be played and their Geotagging metadata displayed. iPhone and Android smart phone files are also supported, but for models that store Geotagging information it is usually for the beginning of the file.
The Geotagging information can be displayed in the player's metadata pane by checking the Display Geotagging data option in Tools > Options > General. This changes the contents of the metadata pane - instead of showing the camera's exposure settings it shows the Geotagging items (and the current date and time). The format of the Geotagging information can also be changed using the other Geotagging options in Tools > Options > General. See the Metadata Display Settings.
Because some of the cameras store the Geotagging data at regular intervals while you are recording, when you play the file in DVMP Pro you will be able to see the GPS location changing as the camera was moved. For example, if you are filming from a moving vehicle you will see the GPS coordinates including speed and direction changing in real time as you watch the video played back.
If you click the menu File > Browser Map (or press CTRL-W) while viewing a file, a Google Map will be displayed in a separate web browser window showing the geographical location where the current video frame was recorded. The exact location is indicated by a marker at the center of the map. Because the Geotagging infomation is stored throughout the duration of the video file it is possible to view the location of the camera at any point in the recording.
Alternatively a Display Map addon is available by clicking the menu File > Display Map (or press CTRL-M). This displays an interactive map with a marker that moves to follow the geographical position of the current video frame. You can also view the complete route that the camera took, drag to pan the map, and zoom in or out.
For more details of the Display Map add-on please see the GPS Geotagging and Maps chapter.
For files that contain Geotagging metadata, there is also an additional Geotagging page in the File > Properties box. The Geotagging values displayed are those at the beginning of the file.
The Burn-in Metadata tool can also be used to stamp the geotagging information onto the video frames.
Geotagging is only supported for AVCHD, XAVC-S, GoPro Hero Black, Insta360 and Contour+ cameras, many iPhone and Android smart phones, and other supported camera types that have built-in GPS units that were switched on and receiving GPS data while recording.
Buttons
The row of buttons along the bottom of the DVMP Pro window are split into 5 groups:
•Play, Pause and Stop
•Step to previous/next frame
•Jump to previous/next scene (DV file types only)
•Mark In/Out points, for use with "Burn-in Time Stamp" and other tools
•Audio mute and volume control

Player Buttons and Controls
The slider above the row of buttons allows you to drag to any position in the video file. If Mark In and Mark Out points have been set, these are displayed as triangular markers, and the marked region is highlighted as a green bar on the slider.
The operation of most of these button is duplicated by entries on the Play menu.
Metadata Display
The metadata is displayed in five columns immediately below the main video display. If any items of metadata are not present in the file they will appear as a series of "-"s.

Metadata window pane
1st Column (Timecodes)
•Timecode - semi colon between secs and frames denotes drop frame
•User Bits (also called "Binary Group")
•File Progress Timecode - this is a timecode generated by DVMP Pro to show the progress into the file. It is not an item of metadata and is therefore displayed in grey. The timecode always starts at zero at the beginning of the file and increases unbroken to the end of the file. It effectively shows the absolute frame number of the currently displayed frame. For HDV, AVCHD and MPEG-2 PS files this is replaced by the Presentation Time Stamp (see notes below).
•Frame Type - this is the frame type I, P or B and is only displayed for HDV, AVCHD and MPEG-2 PS files, and for some MOV and MP4 files.
When paused or frame-stepping the file, progress timecode turns yellow if the current frame is a "dropped" frame (for DV formats only).
Currently, file progress timecode is not displayed for HDV, AVCHD or MPEG-2 PS files. This is due to the nature of the MPEG-2 and AVCHD format which would need the whole file to be scanned before playback could begin. However it can be selected for the Burn-In tool as this effectively scans the file as it goes.
When playing HDV, AVCHD and MPEG-2 PS files the file progress timecode is replaced by the Presentation Time Stamp (PTS). This is not an item of metadata but a timestamp stored in the file structure for each frame. Each frame has a different PTS and is therefore helpful in uniquely identifying each frame when you are frame-stepping, particularly as the other metadata values may not change for several seconds. The PTS is displayed in the form hh:mm:ss.sss where ss.sss is the number of seconds (milliseconds after the decimal point) - it therefore looks similar to a timecode (hh:mm:ss:ff) but it counts fractions of a second rather than video frames. Note that the PTS values are stored by the camera and they might not start from 0 at the beginning of the file. The PTS is only displayed in playback - when using the Burn-in Metadata tool it is the File Progress Timecode that is burnt-in.
2nd Column (Date and Time)
•Time of Recording - hh:mm:ss
•Date of Recording - mm/dd/yyyy, dd/mm/yyyy or yyyy-mm-dd selectable via Tools > Options > General menu
•AM/PM Indicator - only displayed when 12 hour am/pm format is selected
•Metadata Source - the metadata source being used: EMB, HDR, HDA, THM, MOI, MPL, DTC or DTM
•Date/Time Adjustment Indicator - a plus-or-minus symbol ± appears if the displayed date or time is adjusted
Date and time of recording is sometimes referred to as "datacode" or "datecode".
By default the time of recording is displayed in 24 hour format. But if the 12 hour am/pm format option in Tools > Options > General has been selected, an AM or PM indicator appears after the time.
The Metadata Source is selected via the Tools > Options > Metadata Sources menu.
Metadata Source and Date/Time Adjustment Indicator both appear to the right of the Time of Recording.
The Date/Time Adjustment Indicator appears only if the displayed date and time has been adjusted by the Adjust Date and Time by option in Tools > Options > Metadata Sources.
3rd Column (Exposure)
•Shutter Speed - e.g. "50" denotes 1/50th of a second
•Iris - Aperture setting (F-stop)
•Auto Exposure Mode - Automatic, Gain Priority, Shutter Priority, Iris Priority or Manual
4th Column (Exposure and Focus)
•Gain - in dB
•Focus Distance - distance from the camera in meters
•Focus Mode - Manual or Automatic
Focus distance and focus mode is only supported by a small number of cameras.
5th Column (White Balance, Stabilizer and Audio)
•White Balance - Automatic, Hold, 1-Push, Candle, Incandescent Lamp, Fluorescent Lamp (Low Temperature), Fluorescent Lamp (High Temperature), Sunlight or Cloudy
•Image Stabilizer - ON or OFF
•Audio Details - sampling frequency in kHz (32, 44.1 or 48) / L=locked or U=unlocked
Audio Details metadata is only displayed for DV file types. (You can find out the audio details for all file types using the File > Properties menu.)
If Display Geotagging data is checked in Tools > Options > General, the metadata display is different to that described above. In this case the following metadata is displayed:
")
Metadata window pane (Display Geotagging Data)
1st Column (Date and Time)
•Time of Recording - hh:mm:ss
•Date of Recording - mm/dd/yyyy, dd/mm/yyyy or yyyy-mm-dd selectable via Tools > Options > General menu
•AM/PM Indicator - only displayed when 12 hour am/pm format is selected
•Metadata Source - the metadata source being used: EMB, HDR, HDA, THM, MOI, MPL, DTC or DTM
•Date/Time Adjustment Indicator - a plus-or-minus symbol ± appears if the displayed date or time is adjusted
•Presentation Time Stamp - hh:mm:ss.sss where sss is milliseconds (see above for an explanation of the PTS)
By default the time of recording is displayed in 24 hour format. But if the 12 hour am/pm format option in Tools > Options > General has been selected, an AM or PM indicator appears after the time.
The Metadata Source is selected via the Tools > Options > Metadata Sources menu.
Metadata Source and Date/Time Adjustment Indicator both appear to the right of the Time of Recording.
The Date/Time Adjustment Indicator appears only if the displayed date and time has been adjusted by the Adjust Date and Time by option in Tools > Options > Metadata Sources.
2nd Column (GPS Position)
•Latitude - in degrees, minutes and seconds N or S
•Longitude - in degrees, minutes and seconds E or W
•Altitude - height above sea level in meters
3rd Column (GPS Speed)
•Speed - speed of camera's motion
•Track - direction of camera's motion in degrees
Note that Track is the direction that the camera is moving, not the direction that the lens is pointed.
Alternatively Latitude and Longitude can be displayed in decimal, and Altitude and Speed in imperial units by checking one of the corresponding GPS checkboxes in Tools > Options > General.
Playback Navigation
When you are playing a video file, you can change the current playback position by dragging and releasing the slider control.
You can also jump backward and forward through the file via the Play menu, or by pressing the left or right cursor keys in combination with the SHIFT or CTRL keys like this:
File Type |
Cursor key only |
SHIFT+cursor key |
CTRL+cursor key |
|---|---|---|---|
DV AVI / Raw DV / MOV / MP4 |
jump 1 frame |
jump 1 second |
jump 1 minute |
HDV / AVCHD / MPEG-2 PS |
jump 1 frame |
jump 1 I-frame |
Note the slight difference in operation for DV, HDV, AVCHD, MPEG-2 PS, MOV and MP4 files.
If you need to study the image detail of individual video frames, you will find that the frame-stepping feature is a great help - just click the left or right cursor key to step backward or forward by one video frame at a time.
You can also adjust the playback speed. You can increase or decrease the speed in large or small increments using the Play > Speed menu or by pressing the up or down cursor keys in combination with the SHIFT or CTRL keys: SHIFT adjusts the speed in small increments, and CTRL adjusts the speed in larger increments.
Video Rendering and Orientation
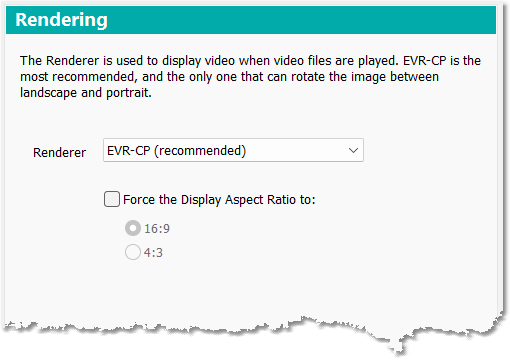 The Video Renderer is a component of Windows that actually displays the video image on the screen in DVMP Pro's player. You can choose between the EVR-CP, EVR, VMR9 and VMR7 renderers in Tools > Options > Rendering. However, it is recommended that you leave EVR-CP selected as it is the most recent video renderer in Windows and usually the most efficient. VMR9 and VMR7 in particular are now quite old and should be avoided if at all possible. Another reason to leave EVR-CP selected is that it is the only renderer that can handle "portrait oriented" video correctly.
Some smartphone users record video by holding the phone "upright" (in portrait orientation), which results in video files where the image is lying on its side when played back on a TV or computer monitor. However, the smartphone usually stores orientation information in the file which can advise any software that plays or imports the file that it was originally shot with the camera/smartphone in portrait orientation. The software can check this advisory information, and if necessary rotate the displayed (or processed) video so that it appears in its original portrait orientation.
The only Windows renderer that is capable of rotating portrait oriented video so that it appears "upright" rather than lying on its side is the EVR-CP renderer. We therefore recommend that you always leave the default EVR-CP selected in Tools > Options > Rendering. For more details of this setting, see Options - Rendering. For a better explanation of video orientation see the Portrait Oriented Video section.
If, as sometimes happens, the file's advisory information is incorrect or there is no advisory information at all, you can manually change the displayed orientation in the player by clicking the Play > Rotate Right menu. Alternatively you can simply press the R key - each key press will rotate the video through 90, 180 and 270 degrees.
Most of the time, video will be played with the correct Display Aspect Ratio, but you can also force it to display as 16:9 or 4:3 by using the Force Display Aspect Ratio setting in Tools > Options > Rendering.
All of the settings in Tools > Options are described in the Options chapter.
Jumping Between Scenes (DV files only)
Currently this feature only works for DV file types. If you only use HDV, AVCHD, Sony HDD/DVD, MOD, MOV or MP4 files then you can ignore this section.
When you first install DVMP Pro, a scene (or scene-change) is defined as a discontinuity in the date and time of recording. This discontinuity happens when you stop or pause the camera during recording. By searching through a DV AVI (or Raw DV) file for these discontinuities DVMP Pro can locate where these "pauses" took place, and you can use the Previous Scene  and Next Scene
  buttons to jump instantly between scenes.
This "jump to previous/next scene" feature requires that DVMP Pro scans the whole file to detect the scene-changes. Depending on the size of the file, this scan may take a while. Consequently when you open the file, DVMP will not perform this scan until the first time you click the Previous Scene or Next Scene buttons - this will save time if you don't need to jump between scenes. When the scan completes, a tick mark will appear on the slider showing the location of each scene-change detected.
You can change the definition of a scene by ticking/un-ticking metadata items in the Tools > Options > Scenes menu. By default only the Recording Date/Time is ticked which means (as described above) that a scene is a discontinuity in the date and time that was recorded by the camera. But you can tick or un-tick any of the other metadata items to change the meaning of a scene. The tick marks on the slider will change instantly - the file does not need to be rescanned.
For example, if you have been using free-running timecode and wish to quickly locate every frame where the camera was paused you would tick only Timecode discontinuity in the Scenes tab. The scene-change markers will then update to show where the timecode discontinuities occur, and you can jump directly to these points using the Previous Scene and Next Scene buttons.
Also, by ticking any of the other metadata items in the Scenes section you can choose to locate where there are changes to white balance, iris or shutter settings etc, and jump instantly between them.
Other Player Features
DVMP Pro allows you to use drag and drop. Just drag and drop a supported video file onto the DVMP Pro window and the file will be opened as if you had used the File > Open menu.
The File Progress Timecode can be displayed as either a timecode or as an absolute frame number. This can be selected in Tools > Options > General. Frame numbers start from 0.
See Also: