Some recent video cameras are equipped with built-in GPS units that allow them to store the geographical location where each video clip was recorded.
Some cameras store a single static geographical location for each recorded clip, so each file "knows" where on earth it was recorded. This is referred to as Geotagging. Usually the single static location is the position of the camera at the beginning of the recording.
More usefully, some cameras store the current location at regular intervals as it records, so the recorded file contains not just the video but also an account of the route taken by the camera. So for example if you are shooting from a moving vehicle then the recorded file will contain the route that the vehicle took while recording was in progress.
All of this Geotagging information is stored in the video file as metadata.
For supported files, DVMP Pro is able to display the changing GPS location while playing the video file. It can also export or burn-in this information, so you could effectively overlay your video with the corresponding GPS coordinates. It can also display a map of the GPS location.
DVMP Pro supports display/burn-in/export of GPS Geotagging information for the following file types:
•AVCHD MTS/M2TS files
•XAVC-S MP4 files
•Files from Sony AVCHD cameras that are set to record in standard definition mode (MPEG-2 Program Stream files)
•Files from GoPro Hero Black ranges of cameras
•Files from Contour+ range of cameras
•Insta360 files
•iPhone and most Android smart phones
|
IMPORTANT: The camera that produces these files MUST be equipped with a GPS unit which must have been switched on and receiving GPS satellite data while the recording was made; otherwise no Geotagging information will be available. |

Most of the above record the route taken by the camera; others just record a single static GPS location.
When the information is available in the file, DVMP Pro supports the following GPS metadata items:
•Latitude
•Longitude
•Altitude
•Speed
•Track
The last 2 items are the speed and the direction of travel of the camera. Track is the direction that the camera is traveling, not the direction that the lens is pointed.
The items of GPS metadata that are stored can vary from camera to camera. Some store all of the above items while others may only store latitude and longitude.
Viewing the Geotagging Metadata
You can view the Geotagging metadata by playing a file in DVMP Pro (File > Open menu). By default DVMP Pro will only display the camera exposure details, so you must have checked the Tools > Options > General > Display Geotagging data setting. This changes the contents of the metadata pane - instead of showing the camera's exposure settings it shows the Geotagging items (and the current date and time).
The format of the Geotagging information can also be changed using the Geotagging options in Tools > Options > General. The latitude and longitude can be displayed as degrees, minutes and seconds or as decimal fractions of a degree. Also altitude and speed can be displayed in metric or imperial units. See the Metadata Display Settings for more details.
For files that contain Geotagging metadata, there is also an additional Geotagging page in the File > Properties box. The Geotagging values displayed are those corresponding to the beginning of the file.
Viewing a Map
 DVMP Pro provides two ways of displaying a map which shows the camera's location: Browser Map and Display Map. Both require an internet connection to display the Map.
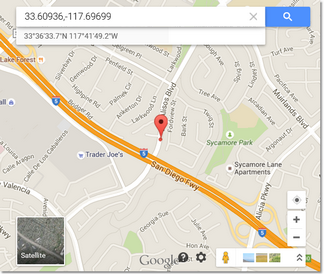
Clicking the menu File > Browser Map (or pressing Ctrl-W) will invoke your computer's default web browser to display a static map showing the current location of the camera. A marker in the center of the map shows the position of the camera that corresponds to the current video playback position. Each time you click File > Browser Map a new web browser window/tab will be invoked.
DVMP Pro also has the Display Map add-on which can display a moving map showing the camera's current GPS location and the complete route that the camera took during the recording of the video file. See below for details.
The "Display Map" Add-On
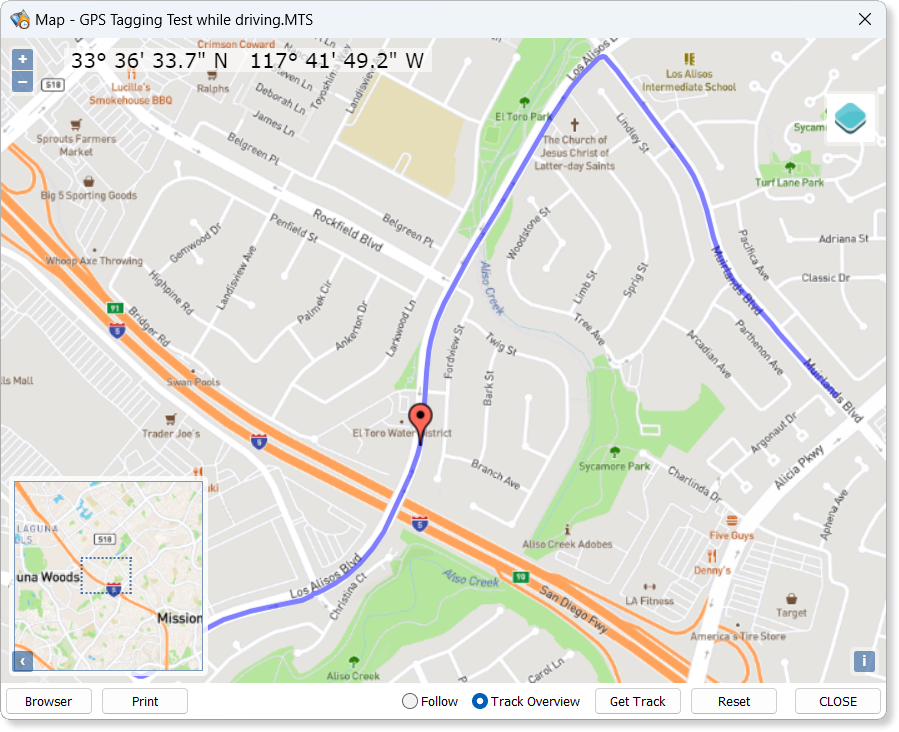 The Display Map add-on can display a moving map showing the camera's current GPS location and the complete route that the camera took during the recording of the video file.
The map is displayed in a separate Map window. If you open a supported video file that contains GPS location information and then click File > Display Map (or press CTRL-M) the Map window will appear.
The displayed map is actually provided by a third-party map imagery provider who sends the map images directly from their own web servers to your computer, so an internet connection is required. Two map imagery providers are currently supported: Mapbox and Geoapify. To view the maps, you will need to set up your own account with Mapbox or Geoapify (or both) - see below for details.
A red marker will appear at the center of the map showing the current location of the camera. As playback proceeds, the marker will move to show the corresponding location of the camera in real-time. You can also drag the playback slider or step backwards or forwards through the file and the marker position will change to show the corresponding geographic location.
Occasionally, the video file may contain periods of missing GPS metadata where satellite lock may have been lost during the recording - when this has happened the marker changes to a circular grey "?" marker. If this missing data occurs at the start of the file (or if a file is opened which contains no GPS metadata) then only the message "No GPS Data available" is displayed - the map will only appear when valid GPS metadata is encountered during playback.
If the video file only contains a single static GPS location (corresponding to the start of the recording), then a yellow "S" marker is displayed which does not move.
Two map views are available:
•Follow and
•Track Overiew
Follow view is the default. Here the marker is always in the center of the map area, and the map automatically scrolls beneath it as the camera moves.
Track Overview displays the map so that the complete track (i.e. route) of the camera is visible in blue. The map remains stationary so that the whole track is always visible. As the file plays, the marker moves along the track.
When you switch to Track Overview, the track is automatically read from a GPX file which is located in the same folder as the video file and has the same file name but with a .GPX extension. The track is then drawn as a thick blue line across the map.
If the GPX file does not exist then no track will be displayed. In that case you should click the Get Track button. The video file is then scanned and the GPX file created - the track will then be displayed on the map.
You can switch between the two views by clicking the Follow or Track Overview radio buttons at the bottom of the Map window.
If you wish, you can pan the map in any direction by clicking and dragging the map. You can also zoom in or out using the + and - zoom controls near the top-left of the map. This can help you to look at the surrounding area or see the location in a bigger context. You can also click the Overview Map control near the bottom-left of the map and a larger scale map is displayed, showing the area covered by the main map. If you have panned or zoomed the map you can easily reset the map to its normal position by clicking the Reset button.
You can print the map by clicking the Print button and selecting the required destination printer. You can also save the map as a PDF file by clicking the Print button and selecting Save as PDF as the destination printer.
Clicking the Browser button (or pressing Ctrl-W) is the same as clicking the File > Browser Map menu described above - it invokes your computer's default web browser to display a static map showing the current location of the camera. It can sometimes be helpful to compare the imagery of Display Map with that of the Browser Map.

Map style selector
In the Display Map window, two or more map styles are available and you can switch between these by clicking the popout map control near the top-right. The exact number of map styles that are available will vary depending on whether you have a Mapbox or Geoapify account, or both. The maps are all normal vector maps with differing amounts of detail, but Mapbox also has an aerial/satellite photographic map available for selection. Note that satellite imagery may not be available for some areas of the world.
|
INFORMATION: Please be aware that an account with Mapbox and/or Geoapify is required to display the map images, and they may charge you directly if you exceed your quota of free map views. |
The map detail and imagery is provided by Mapbox or Geoapify directly from their servers. Before you can view any maps, you must set up your own account with Mapbox or Geoapify (or both) at their web site www.mapbox.com or www.geoapify.com (if you haven't already done so).
Mapbox is a popular commercial provider of mapping imagery and charges you fees depending on the number of "map views" you make per month. It is free of charge for the first 200,000 map views each month, and then 0.50 USD per 1,000 additional "map views" - this is correct at the time of writing, but of course their pricing structure and free quota may change in the future so be sure to check their web site for up-to-date pricing (look for their "Static Tiles API").
Geoapify has a similar system of "credits", where 1 credit is equivalent to 4 "map views".There is a free quota of 3,000 credits every day which is equivalent to 12,000 "map views" (around 360,000 per month). You don't have to provide card details until you exceed the free quota, so you may prefer Geoapify if you are concerned about inadvertently exceeding your free quota. Note that Geoapify does not currently have an aerial/satellite map style available, so a Mapbox account is required for that.
When you sign up for your Mapbox or Geoapify account they provide you with a special key which is simply a line of text that uniquely identifies your account. Mapbox calls this an "Access Token" while Geoapify calls it an "API Key". You then paste your Access Token or API Key text into DVMP Pro's settings, and DVMP Pro will use it to request and display the Mapbox or Geoapify map images in the Display Map window.
The map that fills the whole Display Map window is actually comprised of a set of map "tiles", each is 512x512 pixels in size, so it may take several tiles to fill the Display Map window. Each map tile requested by DVMP Pro (or any other mapping software that you may use) adds to your Mapbox or Geoapify account's monthly "map views" count (1 map view = 1 map tile), and hence affects the transaction fees that you may be charged if you exceed your free quota. If you pan or zoom the Display Map window, that will also result in more map tiles being requested, so be aware that the map view count may increase faster than you might expect! You can view the current level of usage by launching a web browser and signing into your Mapbox or Geoapify account.
Please note that we do not have any connection with Mapbox or Geoapify. By entering your Access Token or API Key into the settings of DVMP Pro (or any other mapping software that you might use) you are granting it permission to use some of the "map views" quota of your own Mapbox/Geoapify account. However, DVMP Pro does not know anything about your actual account, so it can not tell which Mapbox or Geoapify plan you have, the pricing structure, nor whether you have exceeded your free quota. So it is entirely your own responsibility to administer your Mapbox/Geoapify account, and check on the level of map usage on a regular basis. If you wish to avoid exceeding your free quota then you must check on the usage levels yourself in the account dashboard.
It is not possible to avoid Mapbox or Geoapify charges if you exceed your free quota, so if you are uncomfortable with being charged a fee you should not create an account. Of course that will mean you can not use the Display Map add-on.
|
IMPORTANT: We are not responsible for any fees which you may be charged by Mapbox or Geopify for map images that are displayed in DVMP Pro. When you sign up for a Mapbox or Geoapify account, the contract is between Mapbox or Geoapify and yourself and you alone are responsible for complying with their terms and conditions and the payment of any fees to them. Before you decide whether to set up a Mapbox account, be sure to check their Terms and Conditions on their web site, and details of what fees you are charged if you exceed your free quota. There are similar pages for terms and fees on the Geoapify web site.
|


Mapbox usage example
If you are happy to create your Mapbox account, go to www.mapbox.com and click Get Started. You will be asked for a new user name, your email address and a password for your new account. On your account's Home page you will see your default Access Token for your account - click the copy button next to the Access Token which copies it to the Windows clipboard. Then in DVMP Pro, go to the menu Tools > Options > Add-ons > Display Map and click the Set Mapbox Access Token button; click the Paste button and then OK which tells DVMP Pro to store your Access Token for use by the Display Map add-on. Please see Options - Display Map for more details of how to enter your Access Token into DVMP Pro.
In your Mapbox account, click Statistics and you can view the current number of Map Views used up this month - beware that the total displayed is not in real-time so it may be delayed by several hours. You should check this on a regular basis. If you no longer wish to use your account, click Settings and then the Delete button.
If you prefer to use Geoapify rather than Mapbox, you can find instructions for setting up a Geoapify account and creating your own "API key" on their Getting Started web page. Copy the API Key from your account, and then in DVMP Pro click the menu Tools > Options > Add-ons > Display Map and click the Set Geoapify API Key button; click the Paste button and then OK to store the key. Unlike Mapbox, Geoapify does not ask for a payment method when you sign up, which you may find preferable, but it does not currently have an aerial/satellite map style available (Mapbox does).
If you wish, you can set up accounts with both Mapbox and Geoapify and switch between their map views in the Display Map window.
All of the above information about Mapbox and Geoapify is correct at the time of writing. For up-to-date details and conditions, please see their respective web sites.
Burning-in GPS Information
You can use the Burn-in Metadata tool to permanently "stamp" latitude, longitude or any of the GPS metadata items onto your video frames. There are a set checkboxes for each GPS metadata item on the Tools > Burn-in options page - you just have to check the items that you require and use the Burn-in Metadata tool as usual to stamp these items onto the video.