The Play menu allows you to navigate through the file that is open in DVMP Pro. It also allows you to mark In and Out points that define a start and end point for the Burn-in and other tools.

Play menu
Navigation differs slightly depending on the type of file that is open.
For DV AVI, DV MOV and Raw DV files, you can start playback or pause it, frame step backward or forwards, and jump in either direction by 1 second or 1 minute increments. You can also jump to the previous or next scene.
For AVCHD, HDV, MOV, MP4 and MPEG-2 PS files, you can start playback or pause it, single frame step backward or forwards, and jump to the previous or next I-frame. It is not possible to jump between scenes so that part of the Play menu is greyed-out.
If an AVCHD, HDV, MOV, MP4 or MPEG-2 PS file is open, the Fwd 1 sec and Back 1 sec items are replaced with Fwd 1 I-frame and Back 1 I-frame.
All of the navigation operations are duplicated by keyboard hot-keys which are visible in the Play menu. You'll find the hot keys a lot quicker to use than the Play menu.
Speed
This sub-menu allows you to adjust the playback speed Faster or Slower in increments. Faster (fine) and Slower (fine) allow finer speed adjustments. The speed can be gradually increased to 8x normal speed or reduced to 0.1x, and the current speed is displayed briefly over the video image. Clicking Normal speed will return the playback speed to 1x.
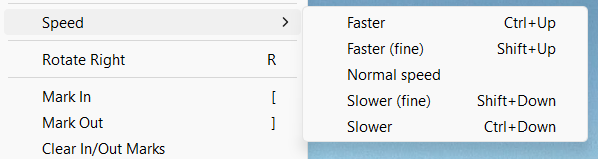
You will probably find it easier to use the up and down cursor keys in combination with the SHIFT or CTRL keys. Pressing the up or down cursor keys with the SHIFT key will make fine adjustments to the playback speed; pressing the up or down cursor keys with the CTRL key will make coarser adjustments to the speed.
Rotate Right
This allows you to rotate the displayed video image in increments of 90 degrees. This is handy for video that was shot in portrait orientation but is being incorrectly displayed in landscape orientation (i.e. displayed on its side). This can sometimes happen when the file contains incorrect or missing orientation information. Each click rotates the image through 90, 180 and 270 degrees so you will always be able to view the image the "correct" way up.
You may instead find it quicker to press the R shortcut key.
Please note that this menu just rotates the image in the player, it does NOT change the orientation information in the file - if you need to change the rotation information in the actual video file, see the Save Rotation tool.
A handy tip is that if you use the Burn-in Time Stamp, Burn-in New Time Stamp or Burn-in Metadata tool with one of the MP4 output file types selected, then the output file will have the same rotation as the image displayed in the player. For example, if the video was originally recorded in portrait orientation but it is incorrectly playing in landscape orientation, just press the R key so that the image is displayed the correct way up, then use the required Burn-in tool - the resulting burned-in output file will be the correct way up too! This tip also works if you want a time stamped freeze-frame image saved to an image file or copied to the clipboard by clicking the File > Save Image or File > Copy Image to Clipboard menu - the image will be saved or copied with the same orientation as displayed in the player window.
For more details of video orientation and rotation, see the Portrait Oriented Video topic.
Mark In & Mark Out

Mark In/Out selection region
Mark In and Mark Out allows you to set the start and end position which is used by several of the tools. For example, if you want to time stamp a single video file, you can open it in the DVMP Pro player and click the Tools > Burn-in Time Stamp menu which will time stamp the whole file. But what if your video file is quite lengthy but you only need a few seconds of time-stamped footage from it - you don't want to wait for the whole file to be stamped when you only need a few seconds of it. You can use Mark In and Mark Out to set the start and end points of just the section of video that you want.
So after you open the file, pause playback, then drag the slider to the beginning of the region that you actually want - use the left and right cursor keys to step to the exact frame if you wish. Then click Play > Mark In (or press the [ key). You will see a triangular "in" marker appear beneath the slider. Then drag the slider or frame-step to the end of the region you want, and click Play > Mark Out (or press the ] key). You will then see an "out" marker appear and the selected region between the in and out marks is highlighted in the slider's channel. Now if you click Tools > Burn-in, only the selected region will be time stamped - you will find this a massive time-saver!
The Mark In and Mark Out selection is also used by many of the other tools, so you can export metadata or extract audio for just the selected range.
You can clear the In and Out marks by clicking Play > Clear In/Out Marks.
You'll probably find it easier to Mark In and Mark Out by pressing the square-bracket [ and ] keys on the keyboard instead of clicking them on the Play menu.
See Also: