The following items appear under DVMP Pro's File menu.

File menu
Open
This allows you to select the file to be played by DVMP Pro. This must be a supported MOV or MP4 file, an AVCHD or NXCAM file, a DV AVI file, a Raw DV file, a DV MOV file, or an HDV file, .
The file can also be a Sony HDD or DVD video file or a MOD file. These are standard definition video files which are recorded by some camcorders onto a hard disk drive (HDD), a recordable DVD disk or a memory card. These file types are all recorded in "MPEG-2 Program Stream" (often abbreviated to "MPEG-2 PS") format although their filename extensions may vary (.mpg, .mpeg, .vob, .mod), so they are all referred to collectively here as MPEG-2 PS files. For more details of this file type see Supported MPEG-2 Program Stream file types.
MOV and MP4 files produced by most video cameras and mobile devices are supported. MOV and MP4 are actually general file containers that are produced by a huge range of devices and software, many of which do not store any of the required metadata. Consequently DVMP Pro tries to support MOV and MP4 files from as many video camera devices as it can, but it does not claim to support files from every possible device. For more details of this file type see Supported MP4 and MOV file types.
As well as standard DV AVI files, Canopus DV AVI, DVCPRO25 and DVCAM files are supported; plus DV MOV files (DV format stored in a MOV file container).
Both HDV1 (720-line) and HDV2 (1080-line) variants of HDV are supported.
HDV files usually have the file name extension .m2t, but some video editing programs give them a .mpg or .mpeg file name extension although the file contents are the same. DVMP Pro allows all of these file name extensions and examines the file contents to see if the file really contains M2T formatted data. The file will only be opened if it is HDV-compliant with embedded metadata present. The M2T file type is a general file container which may contain any type of MPEG-2 video - DVMP Pro only supports HDV-compliant M2T formatted files.
Similarly, AVCHD files have the file name extension .m2ts or .mts and DVMP Pro allows both of these. Only AVCHD-compliant .m2ts or .mts files are supported.
The selected file begins playing as soon as it is successfully opened. The filename appears on the window banner, together with the tape/reel name in brackets (if present).
See the Supported File Types chapter for more details of supported MOV, MP4, AVCHD, HDV, DV and MPEG-2 PS files, and the Playing Video Files chapter for more details about playing them.
Close
Closes the file that is currently open in DVMP Pro.
Save Image

This allows you to save an image file of the video frame that is currently being displayed in the main DVMP Pro player window. You can also choose the image to have burned-in time stamp or burned-in metadata.
You'll probably know that you can use the Burn-in Time Stamp tool to stamp the original recording date and time on a video file, but it takes time to process the whole file. Sometimes you just need a single still-frame image from your video which has the time-stamp written across it - perhaps to include the image in a word processor document or as a photo to be sent as an email attachment. That's where Save Image can be a real time-saver. It works the same as the Burn-in Time Stamp and Burn-in Metadata tools (using the same settings) except that it just stamps/burns-in the current video frame instead of the whole video file.
Just pause playback of your video file, then use the slider or left/right cursor keys to navigate to the exact video frame that you want.
If the image in the player window is the wrong way up, which can sometimes happen if the camera that recorded the video file had stored incorrect orientation information, then you can click Play > Rotate Right (or press the R key) to rotate the image until it displays the correct way up.
Then click File > Save Image and choose one of
•With Time Stamp
•With Metadata
•Image Only
With Time Stamp and With Metadata work like the corresponding Burn-in Time Stamp and Burn-in Metadata tools. If you just want the image without any text written across it then choose Image Only.
A file save dialog pops up that allows you to choose the file name and location of the image file. You can also choose the image file type as JPG, BMP, PNG or TIF. Click OK to save the image.
The quality of the saved JPG image can be set using Tools > Options > General > Save Image JPEG Quality.
You can also use the following shortcut keys:
CTRL+S is the same as Save Image > With Time Stamp
CTRL+SHIFT+S is the same as Save Image > With Metadata
Copy Image to Clipboard

This allows you to copy the video frame that is currently being displayed in the main DVMP Pro player window to the clipboard as an image. You can also choose the image to have burned-in timestamp or burned-in metadata.
Copy Image to Clipboard is the same as Save Image except that the image is copied to the Windows clipboard instead of being saved to a file. You can then paste the image directly into a word-processor document or into any other image-aware application.
Like Save Image you can choose to have the image with time stamp, burned-in metadata or just as a plain image. See Save Image for more details.
You can also use the following shortcut keys to copy the image to the clipboard:
CTRL+C is the same as Copy Image to Clipboard > With Time Stamp
CTRL+SHIFT+C is the same as Copy Image to Clipboard > With Metadata
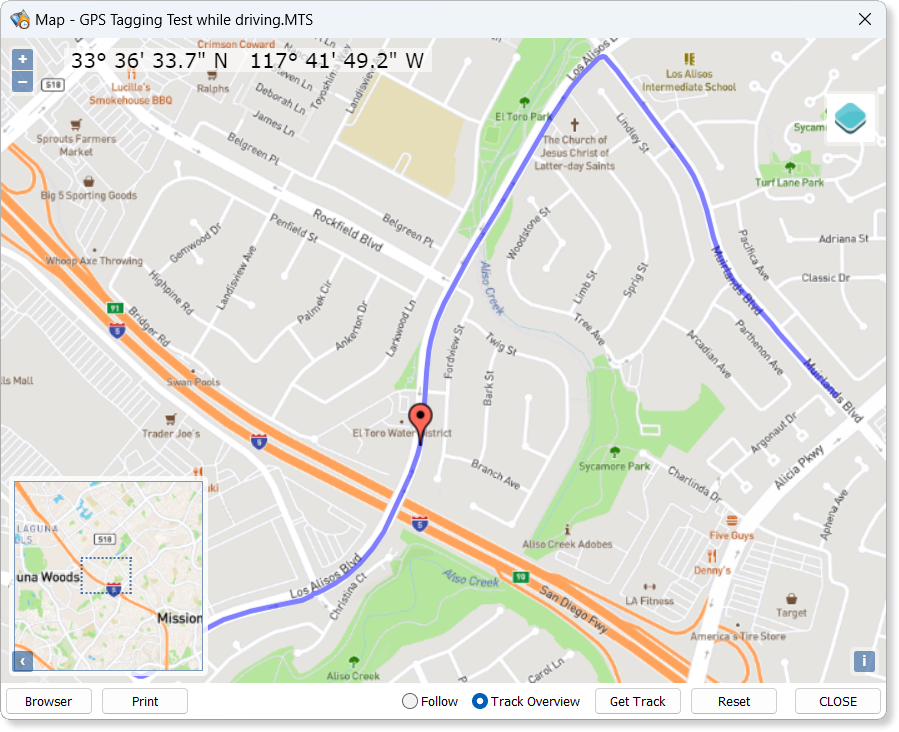
Display Map
|
INFORMATION: An account with Mapbox or Geoapify is required to display the map images, and they may charge you fees directly if you exceed your quota of free map views.
|

This menu allows you to view a moving geographical map of the shooting location of the video file that is open/playing in DVMP Pro. This only works for files produced by compatible AVCHD, GoPro, Insta360, Contour and some other video cameras or smartphones that are equipped with a built-in GPS unit. These cameras use the GPS unit to record the geographical location of each video clip as it is being recorded - a process known as Geotagging. Provided that the GPS/Geotagging feature on the camera was switched on and the camera was receiving GPS data when a clip was being shot, the resulting file will contain Geotagging metadata.
If the file that is currently open in DVMP Pro contains Geotagging metadata, the Display Map menu item is enabled. If it appears greyed-out then this indicates that the file does not contain Geotagging metadata.
When you click Display Map a new window appears containing a map of the area where the recording was made, with a marker showing the camera location corresponding to the current video playback position. The complete route that the camera took can also be displayed on the map. You can use the control buttons to zoom and pan the map, print it out, and display it with vector or satellite imagery.
As you play or seek through the video file, the corresponding position of the marker on the map will update continuously in real-time, and the map will scroll automatically if necessary.
You may find it more convenient to use the shortcut keypress CTRL-M
For more details of how to use the Display Map feature, see the GPS Geotagging and Maps chapter. It also explains why you need a Mapbox or Geoapify account, their fee structure and free quotas, and how to configure the Display Map add-on to use the Mapbox or Geoapify service.
Browser Map
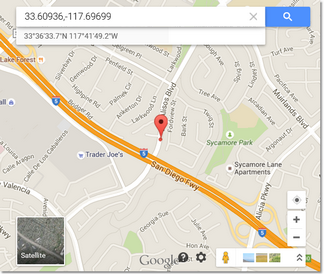 This has a similar purpose to the Display Map menu, but is much less feature rich.
Clicking Browser Map attempts to run your computer's default web browser which displays a Google Map showing the geographical location where the current frame was recorded. The exact location is indicated by a marker at the center of the map. If the camera is moving, the geographical location may change while a clip is being recorded, so you can click Browser Map at any point during playback and the map for the location of the current playback position will be displayed in the browser.
Each time you click Browser Map a new browser window/tab will appear, so it is really only suitable for occasionally checking on the camera position. Also, unlike Display Map, the map does not move. If you want to follow the camera's route in real time then you should use Display Map instead.
You may find it more convenient to use the shortcut keypress CTRL-W.
Batch Processing
This pops up the Batch Processing window which can be used to process multiple files. For further details see the Batch Processing chapter.
Capture DV / HDV
This pops up the Capture DV / HDV window which can be used to capture video from your tape-based DV camcorder to AVI files, and HDV to M2T files. It has a flexible AVI and M2T splitter, and will also capture "live" video from your camera in VTR or Camera mode.
It also has a "Slave To Camera" feature where capture to the hard drive is started/stopped when you start/stop recording by pressing the pause button on your camera.
For further details see the Capture DV / HDV chapter.
Properties

This displays a file properties box that shows a variety of information about the file that is currently open in DVMP Pro. The information will vary depending on the file type. You can also copy any of the displayed property values to the Windows clipboard by right-clicking a value then clicking Copy.
The property names beginning with "Prem" show the information from the Adobe Premiere file header (if present).
If the file is from an AVCHD, GoPro Black, Insta360, Contour or some other video cameras and smartphones that have a built-in GPS unit, and the unit was switched on when the file was recorded, then there will also be a Geotagging tab present. The Geotagging properties show the geographical location of the camera when it began to record this file. The properties are latitude, longitude, altitude, and the speed and direction of camera movement. Note that the Track is the direction that the camera was moving, not the direction in which the lens was pointed.
If you have an account with Mapbox or Geoapify and have entered your Access Token or API Key into DVMP Pro's settings (as explained in Options - Display Map), then the place name corresponding to the latitude and longitude is also displayed. The place name is fetched from the Mapbox or Geoapify servers, so an internet connection is required. The place name is often truncated in the File Properties window, but you can view the full place name by hovering the cursor over it.
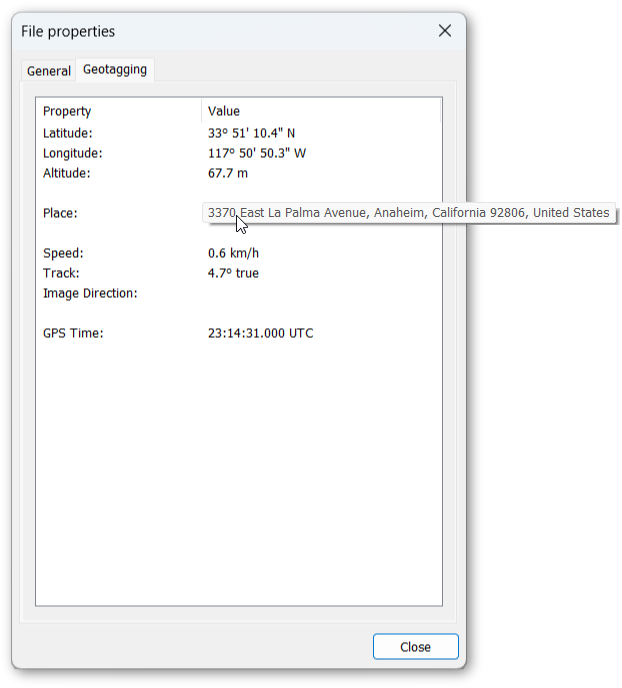
You can also copy the full place name (or any other displayed property) to the clipboard by right-clicking it and then clicking Copy.
If there is no Geotagging data present near the start of the file then there will be no Geotagging tab in the file properties box.
Sometimes the camera might not have established a GPS satellite lock when the recording began, and will therefore have been unable to store its geographical location at the start of the clip file. If DVMP Pro can not find any location information at the start of a Geotagging-enabled file, it will search the first 30 seconds (approx) for it. The location information displayed in the Geotagging tab may therefore correspond to any time within the first 30 seconds of the recording. If the Geotagging tab is empty then this indicates that the camera's Geotagging feature was switched on but it was unable to acquire GPS information for the first 30 seconds of the file's duration.
Recent Files
Provides a quick way of opening one of the last 6 files to have been successfully opened in DVMP Pro.
Exit
Exits DVMP Pro. Note that you are prevented from exiting if the Batch Processing or the Capture DV / HDV window is open.