How to Capture DV and HDV Tapes via USB
Updated: 24-Nov-2025. This is part of a larger article on how to capture/copy DV and HDV video tapes on a Windows computer that does not have a Firewire (IEEE 1394) port. We recommend that you start reading from the beginning of the main article.
Most modern-day computers do not have a Firewire port, so they can not be connected directly to the Firewire port on a DV or HDV camera. But most computers do have a USB-2 (or higher) port, and some DV and HDV cameras have USB ports too, so can’t you just capture/copy your DV or HDV video tapes (MiniDV and Digital8) to your computer over a USB connection? Well, in most cases the USB port on the camera is only available to copy still photos or to use a low resolution “web cam” mode, but not for the transferring of digital DV or HDV video data. However, a small number of DV camera models from most of the major manufacturers were capable of transferring full resolution DV video data over USB.
Before you look at the other methods of capturing DV over USB described below, it is well worth checking whether you already have a model of DV camera that is capable of doing this. If you are lucky enough to own such a model then the solution is much easier, and you won’t have to buy any extra equipment to capture via USB!
Cameras that stream DV over USB
Most DV and HDV cameras that have a USB port are only able to transfer still photo files and low quality “web cam” video over USB. “Web cam” quality means that the camera internally converts the video frames to a lower resolution and a lower frame rate, so that it can be transferred over slow USB 1 ports – this is usually in MJPEG or uncompressed YUV format. Full resolution DV or HDV data could never be transferred in real time over USB 1, so the camera’s faster Firewire port was the only way to make an exact capture of the DV/HDV video data.
The arrival of the faster USB 2.0 specification in 2001, and the UVC (USB Video device Class) protocol a couple of years later, meant that it was then technically feasible for full resolution DV data to be transferred over USB 2.0, and a small number of camera models were released by some major manufacturers that were capable of doing just that, but as far as we know these were only DV (not HDV) models. To enable this capability, the user had to change a setting in the camera’s menu, and install on their computer a DV Streaming driver or USB driver that was bundled on CD with the camera. The manufacturer also recommended that their own bundled DV video capture software was installed and used to capture from the camera. The drivers and software were usually only available for computers running Microsoft Windows XP (no earlier versions of Windows).
Fortunately much of this special software was rendered obsolete when Microsoft provided a DV streaming driver in a later version of Windows XP, and it is still available in Windows 10 and 11. This means that if you are one of the fortunate owners of one of these cameras, you can simply plug it into the USB port of your modern Windows 10 or 11 computer and begin capturing using your own favourite video capturing software – no need to install any of those old drivers or software from the CD! So on these cameras you effectively have the choice of capturing DV video via a USB or Firewire connection.
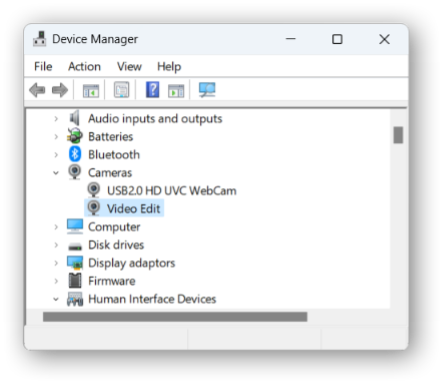
When you connect the camera to the computer via USB, the camera will appear in the “Cameras” category of the Device Manager. Usually devices are listed with a descriptive name, but in this case the camera has the unhelpful name of “Video Edit”. The camera will therefore appear in your capture software as “Video Edit” too.
If your capture software does not detect the camera, then you may have to grant permission for it – go to Start > Settings > Privacy & security > Camera and make sure camera access is turned on. Also, some anti-virus software blocks access to cameras by default, so you may have to change a setting in your anti-virus software to grant access.
Having written software that captures DV over USB and Firewire, we can confirm that this works well, but there are a few minor issues to be aware of. Firstly, unlike Firewire, the USB drivers that are built into Windows only work for transferring DV data from camera to computer (capture) but not in the other direction; this shouldn’t be a problem nowadays, as it’s unlikely anyone would want to archive DV video back onto tape. Also, some video capture software is not expecting to see DV data arriving over a USB connection so it won’t even detect the connection; you might therefore have to try other capture software if your favourite software won’t work with this. Finally, there seems to be a bug in the Microsoft drivers on some older computers, where if you power-off or disconnect the camera while you are previewing or capturing, it will make the capture application freeze, and you will have to manually kill it; you can get around this by always exiting from the software’s capture window BEFORE you disconnect or power-off the camera.
Given that it is so easy to try this out, it is well worth checking if your camera is one of the few that supports full resolution DV streaming over USB. It is not always easy to find out, so you will need to look closely at the manual that came with it (if you don’t have the manual try Googling for it). To enable full resolution DV streaming over USB, you will usually have to change a setting in the camera menu called something like “DV Streaming”, so that can be a good clue. On Panasonic cameras the setting is unintuitively called “USB FUNCTION > Motion DV”, because at the time the camera was manufactured you could probably only use Panasonic’s own “MotionDV Studio” software to capture from USB.

Of the main manufacturers, Panasonic seems to have had the largest number (though still very small) of camera models that supported DV streaming over USB. We have tried Panasonic NV-GS400 and NV-GS500 cameras and they all capture full resolution DV on Windows 7, 10 and 11 without needing to install the manufacturer’s old drivers or capture software. The NV prefix is for PAL models and PV is for the equivalent NTSC models.
Canon Optura 60, Optura 500 and Optura 600 camcorders were also capable of streaming DV over USB. According to their manuals, you had to set the camera menu “VCR SETUP > AV-DV > OFF”. Like the Panasonic models, they shipped with special drivers that had to be installed on Windows XP. We haven't been able to check these camcorders out, but if they use the same UVC protocol then there is a good chance that they will work OK on Windows 10 and 11 without having to install the old Canon drivers. Let us know if you get this to work!
We haven’t tried any likely candidates from other manufacturers, but apparently the Sony DCR-PC1000 can do this with the menu setting “USB SELECT > DV STREAM”.
Most people are unlikely to own one of these DV cameras, so will need to look at the other suggestions below. Also, we don't know of any HDV cameras that can stream high definition HDV data over USB in that way, so if you have an HDV camera you'll probably have to look at the suggestions below too.
Pinnacle MovieBox
Unfortunately the communication protocols of Firewire and USB are very different, so some conversion hardware is needed that allows the DV or HDV data sent via Firewire from the camera to be received by the computer’s USB-2 port – effectively acting as a Firewire-USB bridge.
There are several small Firewire-to-USB adaptor plugs available, but just by looking at the reviews you will see that none of them work successfully – at least for use with DV or HDV cameras. It requires more sophisticated hardware than a simple adaptor to transfer DV/HDV data reliably between Firewire and USB.
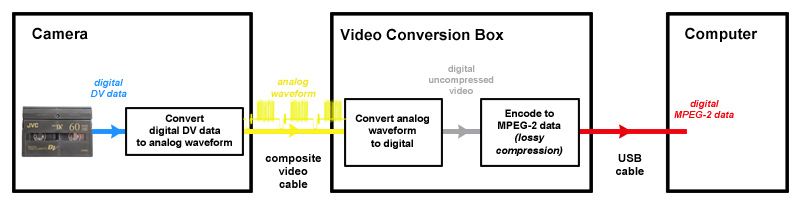
There are also several makes of video conversion boxes (e.g. the Pinnacle Dazzle), but all of those currently available will only accept an analog video signal as input – they do not have a Firewire input. That means you have to connect the camera’s Composite Video output (usually a yellow jack socket) or S-Video output socket to the conversion box using the analog cable that usually comes supplied with the camera. These video conversion boxes work by converting the analog video signal to uncompressed digital video frames, and then digitally encoding the frames usually to MPEG-2 format. The digital MPEG-2 data is then transferred from the video conversion box via a USB cable to the computer which stores it in an MPEG-2 file on its hard drive. Each stage of conversion from analog to digital and then to MPEG-2 loses some degree of image quality, so we do not recommend using video conversion boxes to capture video from DV or HDV cameras.
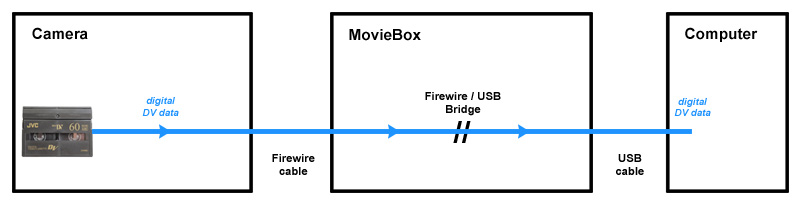
However ... Pinnacle used to produce a series of hardware video conversion boxes for Windows that were branded “MovieBox”. Like most modern-day video conversion boxes, the MovieBox is able to digitise a variety of input analog video formats (such as Composite Video and S-Video) – nothing unusual there. However, more importantly for us, it is apparently unique in also having a Firewire input socket, so you can connect a Firewire cable between the camera and the MovieBox. The MovieBox contains some clever electronics that is capable of acting as a bridge between the Firewire interface on the DV/HDV camera and the USB-2 interface on the computer. So the computer can communicate transparently with the camera, and capture its data all via the computer’s USB-2 port without any conversion or encoding steps. This is ideal because the DV or HDV data that is captured into the video file on the computer’s hard drive is an identical copy of the DV/HDV data that is on the tape.
In 2005 Pinnacle was bought out by Avid but they continued with production, so you may see it referred to as Pinnacle MovieBox or Avid MovieBox. Then in 2012 Corel bought the domestic video product range from Avid which apparently included MovieBox, and unfortunately it looks like MovieBox has not been in production for many years – the DV and HDV formats are getting fairly old now, so this had to happen eventually.
Currently, MovieBox is not available from any major suppliers, but you will probably find it on online auction sites for a while yet. If you have a large collection of tapes it might be worth looking at MovieBox before it becomes more difficult to find.
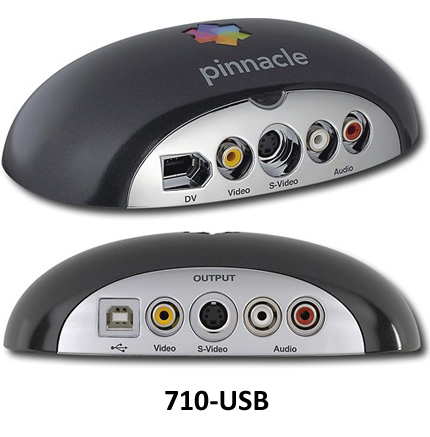
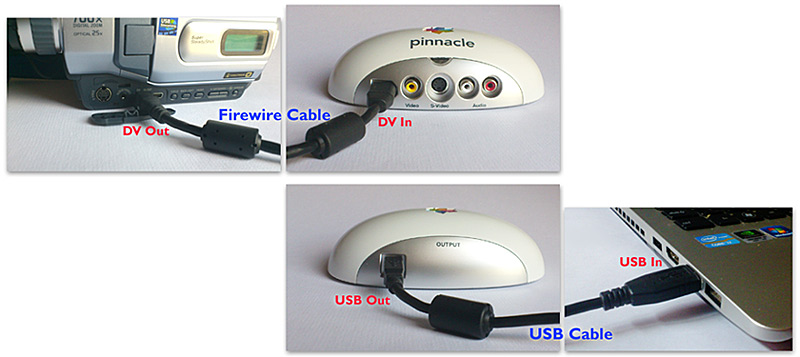
Several Pinnacle MovieBox models were available: the 510-USB and 710-USB, and the slightly older 500-USB and 700-USB models. They were usually sold as a package including Pinnacle’s video editing software, with names like “MovieBox HD”, “MovieBox Studio HD”, “MovieBox Ultimate”, “MovieBox 510-HD”, etc. The product packaging sometimes stated in small print which model of MovieBox was included – otherwise you could usually tell from their shape and color. Also the package usually contained two cables: a Firewire cable to connect the camera to the MovieBox, and a USB cable to connect the MovieBox to the computer.
Note that both of the supplied cables have a ferrite choke at either end. Cables with chokes are often supplied with devices whose electronic circuits generate a significant amount of high frequency noise – the choke helps prevent the cable picking up this noise. The MovieBox might work OK with unchoked cables, but the manufacturers obviously must have decided it would perform better with choked cables. Consequently, if the cables are lost or damaged and you have to replace them with new ones, it might be worth looking only for cables which also have chokes. Most cables do not have a choke, so finding one that does will take a little extra care, and they are likely to be more expensive. Similarly, if one of the supplied cables has the wrong type of plug at one end (for example, if your computer only has the newer USB type C socket), then it is probably easier to use the supplied cable with an extra adaptor, rather than searching for a completely new replacement cable that has the correct plugs and also has a choke.

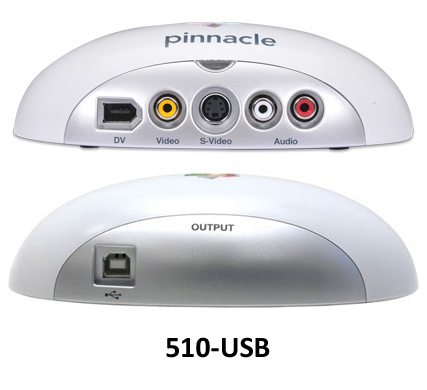
The 510-USB and 710-USB models have a similar oval shape, but are easy to distinguish as the 510 is white and the 710 is black. They both have an identical set of input sockets along one side including Composite video and S-Video, and more importantly for our purposes a Firewire input socket (usually marked “DV in” or just “DV”) that we will use to connect our DV or HDV camera. On the other side, the 510-USB and 710-USB both have an output USB socket that we will connect to our computer. There is no power socket, as it draws all of its power from the computer over the USB cable. We have only tried using the 510-USB, but it’s reasonable to assume that the 710-USB will work too as it uses the same Pinnacle drivers.
Incidentally, Pinnacle are currently advertising that “Studio Moviebox is now called Dazzle DVD Recorder HD and it is better than ever”. However, the Dazzle only has analog input ports so it only acts like an analog video converter box. The Dazzle does not have a Firewire port so it can not be used for capturing digital data from DV/HDV cameras.
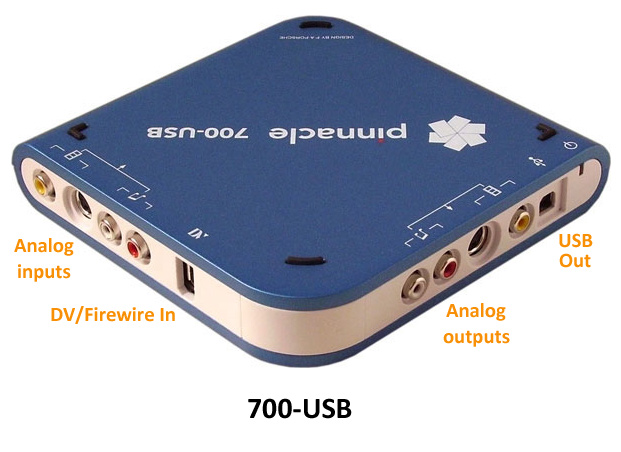
The older 500-USB and 700-USB models have distinctive shapes, and a similar set of analog and Firewire sockets. They might work for DV capture on Windows 11 and 10, but we can’t vouch for that.
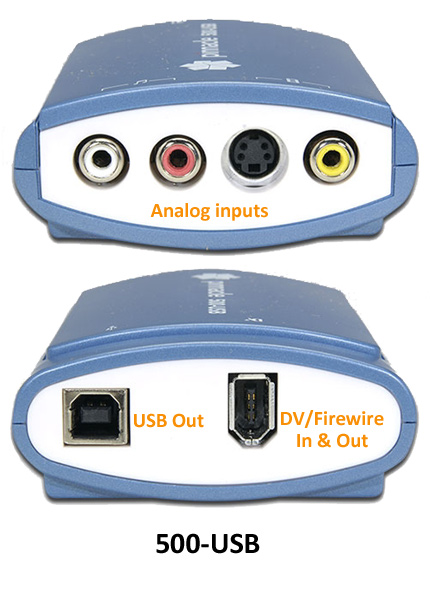
Warning: Pinnacle also produced earlier MovieBox models that look like 500-USB and 700-USB models but have a slightly different set of input and output sockets. For example, one model has no Firewire/DV input socket nor USB output socket, but it does have a Firewire/DV output socket that can only be connected to a Firewire socket on the computer; it is designed to convert analog video to digital DV data which is sent to the computer via its Firewire/DV output socket – it has no USB output socket so that MovieBox model is useless for our purposes. For this reason we recommend that you instead look for the 510-USB or 710-USB models which are easier to identify. However, if you still wish to try a 500 or 700 MovieBox make sure that it has a Firewire input socket (probably marked “DV in”) and a USB output socket. If it has a socket just marked “DV”, make sure it can function as an input, not just for output only!
Incidentally, the main difference between the 7xx and 5xx series is that the 7xx series also has a set of analog output sockets – but we won’t be using those here.
The 510-USB and 710-USB were last in production when the most recent version of Windows was Windows 7, so the supplied device drivers were only supported up to Windows 7. Nevertheless the drivers do still appear to work on Windows 11 and 10.
Installing the Pinnacle Drivers
As you will probably know, Windows 11 and 10 have much tighter restrictions against the installation of device drivers that are not digitally signed by the manufacturer. Although the installer .exe file for the device drivers is signed by Pinnacle, some of the actual driver files it installs are not. However, the drivers do seem to install OK on current versions of Windows 11 and 10, but bear in mind that if Microsoft further tightens its restrictions on drivers then it may be difficult to get them to work or install in the future – but this is just speculation of course.
The drivers are usually included in the “drivers” folder of the software CD that comes with the package, but you may prefer to opt for the most recent version of the drivers, which at the time of writing are still available from the driver download page on the Pinnacle support web site, which is probably the safest place to download them from.
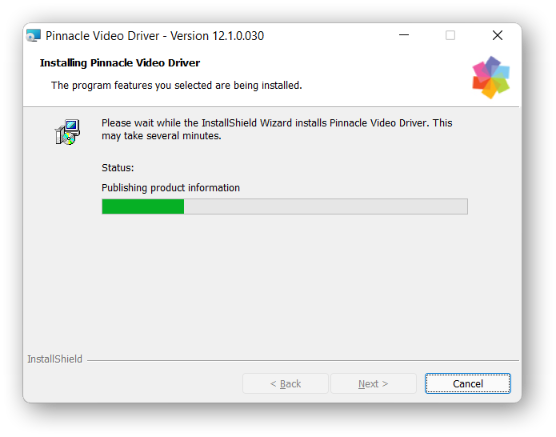
Most people will be using a 64 bit edition of Windows these days, so just click any of the first few 64 bit links labelled version 14.0.0.166 (they are all the same) which will download the Pinnacle_Video_Driver_64bit.exe file. This is the installer file for the 64 bit version of the Pinnacle drivers. If you view its file properties you should see that the file version is 14.0.0.166 and the product version is 12.1.0.029, and that it was digitally signed by Pinnacle Systems Inc in August 2008. This is pretty much the latest version of the file, but you may like to compare it to the file on the CD which may be a slightly newer version – we had file version 14.0.0.166 and product version 12.1.0.030, signed in February 2009. If you are still using a 32 bit edition of Windows then you will have to download the 32 bit version instead Pinnacle_Video_Driver_32bit.exe. For extra security you may wish to virus scan the installer file before running it – uploading it to www.virustotal.com will run it through a large number of antivirus scanners.
Before installing, create a System Restore Point, so that if anything goes wrong you can return your computer to its present state.
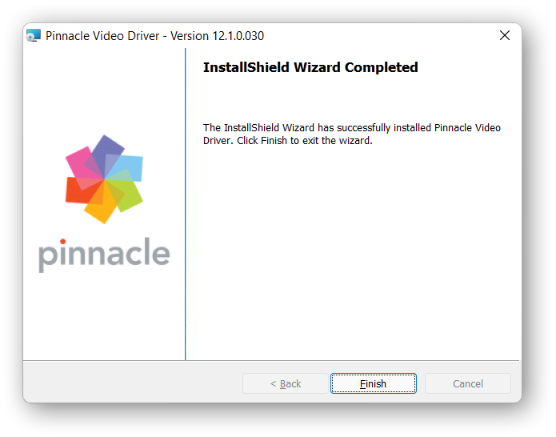
To begin installing the drivers, double-click the installer file Pinnacle_Video_Driver_64bit.exe (or Pinnacle_Video_Driver_32bit.exe).
It will extract a .MSI file and then run it. At this point it will probably present you with a UAC (User Account Control) window that asks for your permission to make changes on your computer, and will tell you that the .msi file is not signed. Pinnacle really ought to have signed this file, but as it is extracted from the exe file which is signed then we can assume it is OK, so click Yes to proceed with the rest of the installation.

If you encounter any problems installing the drivers, it may be due to some of the driver files being unsigned. In this case, try temporarily disabling Windows’ driver signature enforcement check – you can find a step-by-step procedure for doing this in the “Further Tips” section below.
If that doesn’t work either, then try installing the drivers in Compatibility Mode. This makes the drivers believe that they are installing on an older version of Windows – in this case Windows 7. You can find instructions on this Microsoft page – scroll down to the heading “Using Compatibility Mode to Resolve Driver problems”. When you are asked to choose the version of Windows that the drivers worked on before, choose Windows 7. We’ve never had to do this, but if nothing else works, it is worth a try.
A Word about Security
On the subject of security, it’s worth mentioning that because the drivers have not been updated since around 2009, there is a possibility that they have a vulnerability that could eventually be exploited by malware. If you are security conscious, you can mitigate the risk by performing a full virus scan of your computer (in addition to creating a System Restore Point) before you install the drivers. Then disconnect your computer from the internet before you begin to install the drivers, and remain disconnected while you capture the video from your tapes. When you have finished a capturing session, immediately uninstall the drivers. Do not reconnect the internet until the drivers have been uninstalled. If at any time you have to restart your computer, then as soon as it has started up, check that it is still disconnected from the internet – if it has automatically reconnected to a wireless network, then disconnect it again.
Another approach to security is to use disk imaging software (by Acronis, Paragon, EaseUS etc) to create a complete image of your Windows partition just before you install the drivers, then restore the image after you have finished your capture session. It can be quite time consuming to create and restore the partition image, so it’s unlikely you would wish to do this each time you wanted to capture from tape, but if you will only be doing capture sessions very occasionally, then this method is the best way of ensuring that Windows will be restored to its exact previous state. If the imaging software you use gives you a choice of imaging either the “partition” or the “operating system”, then be sure to choose “operating system” – if you choose “partition” then you may end up with the Windows partition being restored but un-bootable! Also do not create your capture files (or any other files) on the Windows partition as they will be overwritten when you restore the image. As mentioned above, you may also wish to keep the computer disconnected from the internet until after you restore the image.
Connecting the MovieBox
Assuming the installation of the drivers has succeeded, using the supplied USB cable, plug the MovieBox directly into the USB socket of your computer. Make sure that it is not plugged in via an external hub or dock. The supplied cable has a USB type B plug at one end that plugs into the MovieBox, and a USB type A plug at the other end that plugs into the computer. If your computer only has USB type C sockets, you could purchase a USB type A to USB type C adaptor; alternatively you could buy a new replacement cable with a USB type C plug at one end which plugs into the computer, and a USB type B plug at the other end which plugs into the MovieBox. As mentioned earlier, if you prefer to buy a new cable, try to find one that has a ferrite choke.
When the MovieBox is successfully connected to the computer, after a delay of a few seconds a light on the MovieBox will illuminate. If the light does not come on, then there may be a problem with the Pinnacle drivers, so try restarting your computer and/or reinstalling the drivers.
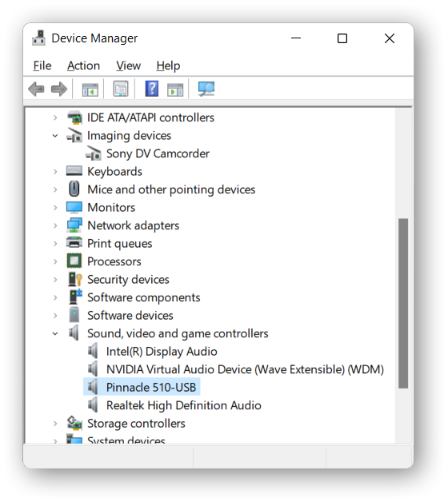
Now launch the Device Manager by pressing the key combination Windows + R (hold down the Windows key while you press the R key); then in the Run window that appears type devmgmt.msc and click OK. Scroll the Device Manager window and expand the “Sound, video and game controllers” category. You should see an entry name similar to “Pinnacle 510-USB” depending on the MovieBox model you have. If it has a yellow exclamation mark against it, then the drivers are not working correctly – perhaps the installation had not worked correctly, so try restarting the computer and then double-click the installer file to attempt the installation again.
Now use the supplied Firewire cable to connect your DV or HDV camera to the MovieBox, and switch the camera to “Camera” mode.
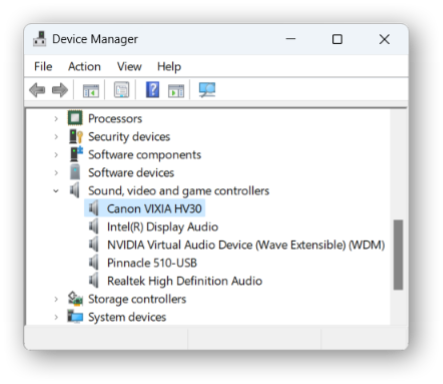
You should now see your camera appear in the Device Manager window: if it is a DV camera it will appear in the “Imaging devices” category, and if it is an HDV camera it will appear in the “Sound, video and game controllers” category. This tells you that everything is working well! Note that the camera name entry will disappear whenever the camera is disconnected or powered off.
Now start up your video capture software. Some video editing software apps can capture from DV or HDV cameras, but many modern apps are dropping this capability because it is perceived to be old technology. If all else fails WinDV is a very simple app that provides basic DV capture capability (or HDVSplit for HDV capture).
We did encounter a minor problem when using a Panasonic GS400 DV camera. When it was fully connected and then switched on, the capture software failed to detect the camera or displayed error messages. There was something about the camera powering-up process that seemed to confuse the Pinnacle drivers – but there is a simple workaround for this. So if your encounter a similar problem with your own camera, leave it powered-on in “Camera” or “VCR” mode while you disconnect the Firewire cable from the camera and then reconnect it again. This triggers the redetection of the camera, which should succeed this time because the camera is already powered up and ready to go. If, later on, you have to switch the camera between “Camera” and “VCR” modes (or it might automatically power-off after a while), then you might have to repeat this disconnect-reconnect procedure again.
You should now be able to capture DV or HDV video directly from your camera as if it had been connected directly to your computer by Firewire. If the app you are using has on-screen buttons to control the camera (like play, pause, fast-forward, etc), then you should find that these work OK too. This all works great in our own DVMP Pro software product.
Further Tips
If you have any problems installing the Pinnacle drivers, try temporarily disabling Windows’ driver signature enforcement. This will allow you to install unsigned drivers until the next computer restart.
Begin by holding down the Shift key while you click the Windows “Restart” button.
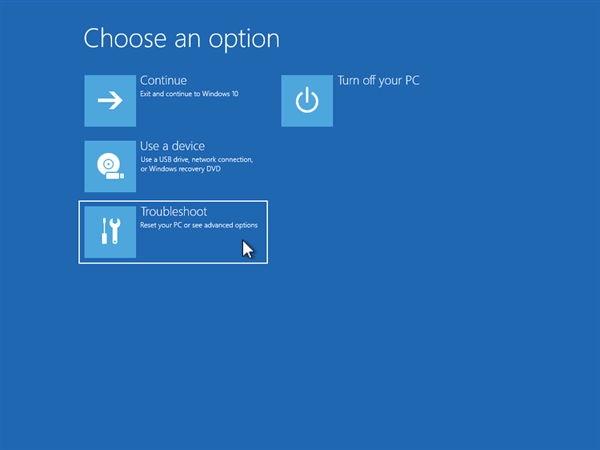
When the blue options menu appears, click “Troubleshoot”.
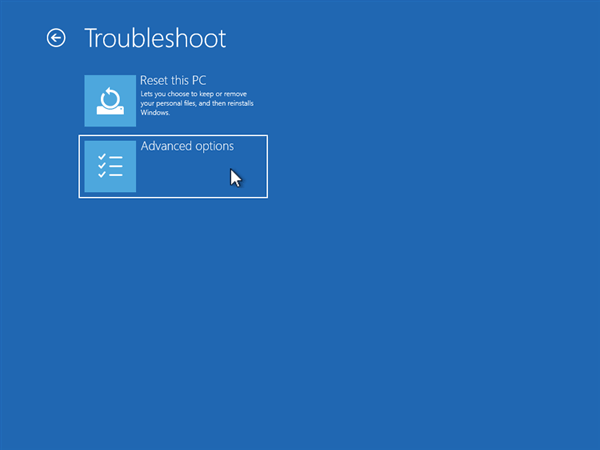
Then click “Advanced options”.
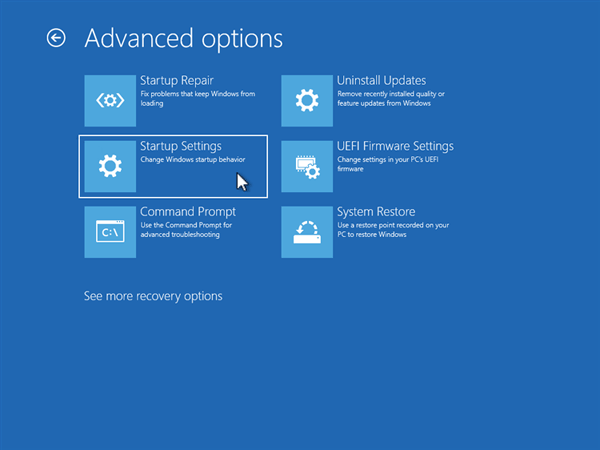
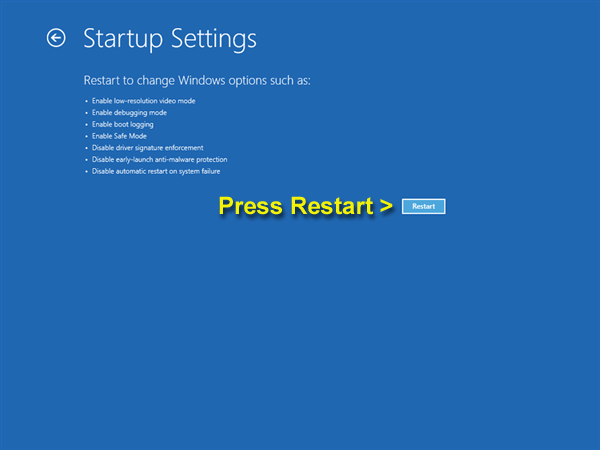
Then click “Startup Settings”.
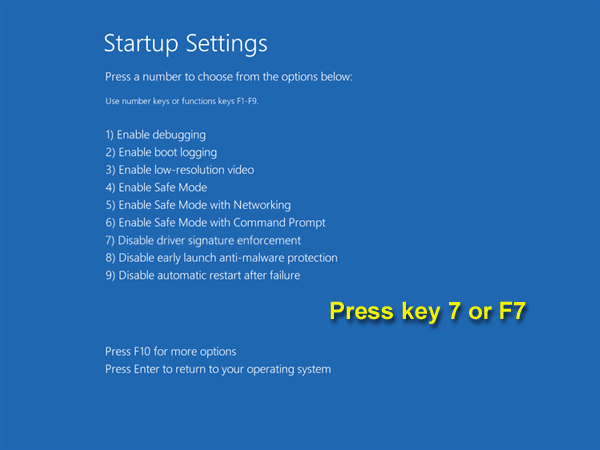
Then press the key 7 or F7.
Finally click “Restart”.
Windows will then start up with the driver signature enforcement disabled. Now try installing the Pinnacle drivers again. When the drivers have (hopefully) installed OK, restart the computer again which will restore the driver signature enforcement back to its original state.