How to Capture DV and HDV Video via Thunderbolt on Windows
Updated: 18-Mar-2024. This is part of a larger article on how to capture/copy DV and HDV video tapes on a Windows computer that does not have a Firewire (IEEE 1394) port. We recommend that you start reading from the beginning of the main article.
If your Windows computer has a Thunderbolt 3 port then you may be able to capture/copy DV and HDV video tapes (MiniDV and Digital8) from your camera to your computer by using a couple of Apple adapters. Although the adapters were originally designed for use with Apple computers, they seem to work fine for Windows computers too.
Before we tell you how to use the adaptors, there are a couple of important points to note:
Firstly, check whether your DV camera is a Panasonic model, because some of them can be used to capture full resolution DV data over USB. If you have one of those models then you will find it so much easier to capture via USB. You won't have to mess about with Thunderbolt adaptors; just connect your DV camera to your computer with a USB cable and start capturing - it’s a no-brainer! Click here for details of how to check whether you have such a camera, and how to capture DV from it over a USB cable. But please note that, as far as we are aware, this only applies to DV cameras - we don't know of any HDV cameras that can do this.
Secondly, on Windows computers, Thunderbolt 4 ports are NOT compatible with these Apple adaptors; so if your Windows computer has Thunderbolt 4 ports then they will probably not work for you. This is because Thunderbolt 4 dropped support for older Thunderbolt 1 and Thunderbolt 2 devices, which includes these adaptors. Thunderbolt 3 and 4 ports look the same, so if you are unsure which you have, you’ll have to check the specs for your specific computer; if you have the “Thunderbolt Control Center” app installed then that will also be able to tell you (see later). Some people claim to have managed to get the adaptors working with a Thunderbolt 4 computer by using an additional Thunderbolt 3 hub and you can find out more on this YouTube clip. However it's probably safest to assume that these adaptors are unlikely to work if you have a computer with Thunderbolt 4 ports, and you'll have to look at other solutions instead.
Another more recent snag is that, as of early 2024, the Firewire to Thunderbolt adaptor has disappeared from the Apple store, and other online stores have it marked as unavalable. So, together with lack of support for Thunderbolt 4, it seems that this is yet another method of connecting DV and HDV cameras to modern computers that is gradually being closed off to us. However it is likely that you will still be able to buy the Firewire to Thunderbolt adaptor from online auction sites for a while, so if your computer has Thunderbolt 3 ports then you may still be able to use this method to connect your DV or HDV camera.
The rest of this article assumes your computer has Thunderbolt 3 ports.
Lots of Windows users are successfully using the Apple Thunderbolt to Firewire adapter to capture video from their DV or HDV camera’s Firewire port, but there are a significant number of people who report that they can not get the Apple adapter to work with their Windows computer.
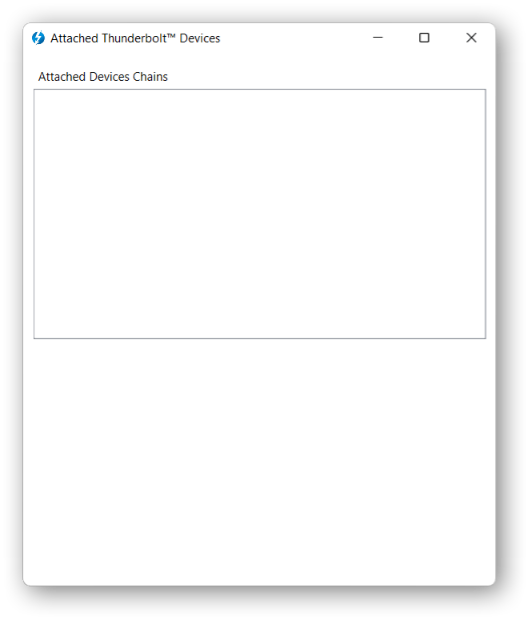
When we tried it with a Windows 11 laptop we couldn’t get it to work either. Despite plugging and unplugging the adapters in different orders and restarting the computer multiple times it just wouldn’t detect the attached Firewire adapter. It would occasionally detect that something had been plugged in, but just display a window with an empty list where the device name should be.
As a security precaution we always use a Standard user account for everyday use of Windows, so we had tried all of the above while logged into the Standard user account. So as a final resort we logged out, then logged into an Administrator account and tried again – and it worked right away, no problem.
So it looks like the device detection/approval does not always work if you are logged into a Standard user account. You must be logged into an Administrator user account for the device approval to work correctly. When the device approval has succeeded, then you can log out of the Administrator account, and henceforth the adaptor should work OK when you are logged into your Standard account.
Most Windows 10 and 11 computers have the Administrator account disabled by default, so we will tell you how to enable it if you need to on your computer.
Of course it’s impossible to know what other reasons there may be why other users have been unable to get this to work, so bear in mind if you do decide to buy these Apple adapters, it might still be a bit of a gamble whether it will work for your particular computer hardware.
We have come up with this step by step procedure which should work in most cases – but no guarantees!
Things to check before buying the Apple adapters
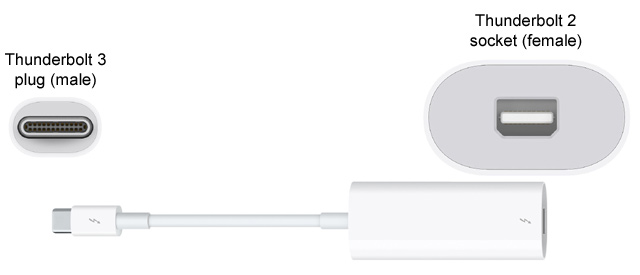
First of all, make sure your computer has Thunderbolt ports. Newer Windows computers may have a Thunderbolt 3 or 4 port which looks like a regular USB-C port, but crucially is marked with a zig-zag thunderbolt symbol. A Thunderbolt port can also do everything that a regular USB-C port can do, so you can plug in a USB peripheral and it will work fine. If the thunderbolt symbol is absent then it is just a regular USB-C port, so your computer must have at least one port with the thunderbolt symbol.

A small number of old Windows computers might have Thunderbolt 2 ports which are also marked with a thunderbolt symbol and look like this:

Please note that we have only tried this procedure with computers that have Thunderbolt 3 ports. In theory it should also work for older computers that only have Thunderbolt 2 ports, but we can’t give any assurances about this.
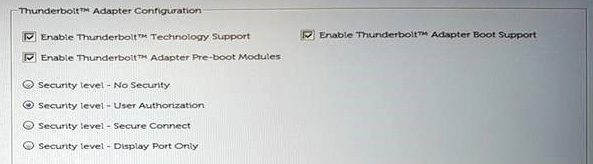
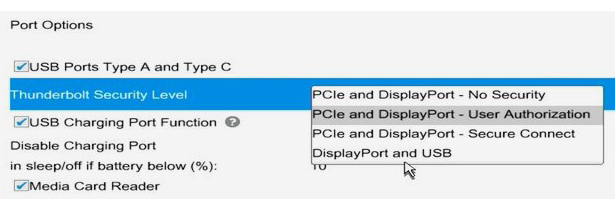
Assuming your computer does have a Thunderbolt 3 or 2 port, it is a good idea to check that the port is enabled in the BIOS. Restart your computer and enter the BIOS menu (see your computer manual for instructions of how to do this). Look through the BIOS menus for a setting that mentions “Thunderbolt” and make sure that it is enabled and the security level is set to “User Authorization”. Here are a couple of example BIOS screenshots from a Dell and an HP computer.
If you need to change the settings, make a note of the current settings before you change them – then if anything goes wrong you can re-enter the BIOS and change the settings back again. Some guides for getting Thunderbolt ports working advise you to update the BIOS if possible. In the spirit of “if it ain’t broke don’t fix it” we would advise you not to update the BIOS yet – instead, follow the instructions below and if they don’t work for you, then you can try updating the BIOS and run through these instructions again.
For the ports to work, your computer must also have Thunderbolt drivers present. Many computers come with Thunderbolt drivers already installed so you don’t have to do anything, but some computers don’t and you would have to install the drivers yourself before the ports will work.
There are two types of Thunderbolt drivers that your computer may have. The older so-called Legacy drivers come with a “Thunderbolt Software” app. Newer computers are instead likely to have the newer type of DCH drivers which come with a different app called “Thunderbolt Control Center”. The two apps are actually very similar, and you can use their menu to approve connected Thunderbolt peripherals and examine their properties. Most computer manufacturers will eventually produce DCH drivers to replace the Legacy drivers, but it’s likely that some computer models may never receive newer DCH drivers. However, for the purposes of this article, it does not matter whether your computer has the “Thunderbolt Software” app (with Legacy drivers) or the “Thunderbolt Control Center” app (with DCH drivers), because both seem to work fine.
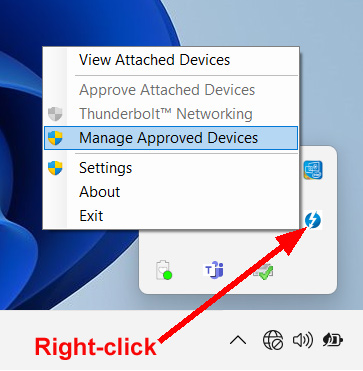
The “Thunderbolt Software” app resides in the Windows Notification Area (also called the System Tray), and you access its menu by right-clicking its icon. The “Thunderbolt Control Center” app is a regular window, and you access its menu by clicking the menu button at the top-left of the window. It doesn’t really matter which of the two apps your computer has, both should work just as well in Windows 11 or 10. This article assumes you have the “Thunderbolt Software” app, but you should find it easy to find the corresponding operations in the “Thunderbolt Control Center” app.
You can find out whether your computer has Thunderbolt drivers already installed by typing “Thunderbolt” into the Windows search box; if it suggests the “Thunderbolt Software” app or the “Thunderbolt Control Center” app then the drivers are already installed.
Even if your computer does have Thunderbolt drivers present, it is a good idea to check if there are newer drivers available for it. Go to the product support section of the manufacturer’s web site and search for the model number of your specific computer. If it displays a support page for your model (sometimes there isn’t an exact match) look among this list of available downloads for “Thunderbolt drivers” – if you find them, check the release date and install them if they seem to be newer than your existing drivers (the web page will sometimes tell you if they are newer than those already on your computer). Some models do not have separate Thunderbolt drivers available, so don’t be too concerned if you don’t see any listed on the manufacturer’s web site – just carry on with the next steps.
What items will you need?
The most important item you will need is an “Apple Thunderbolt to Firewire adapter”, as it effectively provides the Firewire port that is missing from modern computers. There are Thunderbolt to Firewire adapters available from other suppliers, but most people find that only the Apple branded one works reliably – not really surprising since Apple was involved in the original design of the Firewire interface (Firewire is also known as IEEE 1394). This adapter used to be available from the Apple web site and other suppliers, but from early 2024 it seems to have been discontinued, so you may have to look for it on online auction sites – just make sure it is a genuine Apple part.
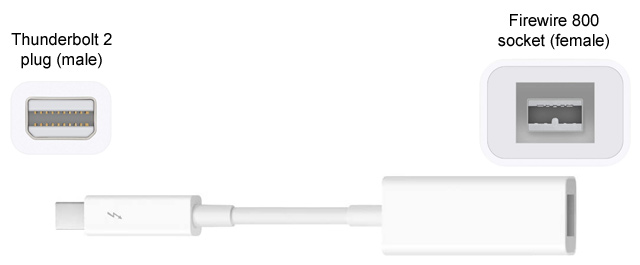
It should more properly be called the Apple Thunderbolt 2 to Firewire adapter as it has a male Thunderbolt 2 plug at one end which plugs into a computer’s Thunderbolt 2 port – if your computer is equipped with one, that is. The other end of the adapter has a Firewire 800 female socket – more of which later.
Most modern computers that have Thunderbolt ports have the more modern Thunderbolt 3 ports which are physically identical to regular USB-C ports. But the Apple adapter has a Thunderbolt 2 plug that will not plug in directly to the computer’s Thunderbolt 3 port. In that case you will also need an “Apple Thunderbolt 2 to Thunderbolt 3 adapter”, which plugs in between the Apple Thunderbolt to Firewire adapter and the computer’s Thunderbolt 3 port.
The last item that you might need is a new Firewire cable to connect your DV or HDV camera to the Apple Thunderbolt to Firewire adapter.
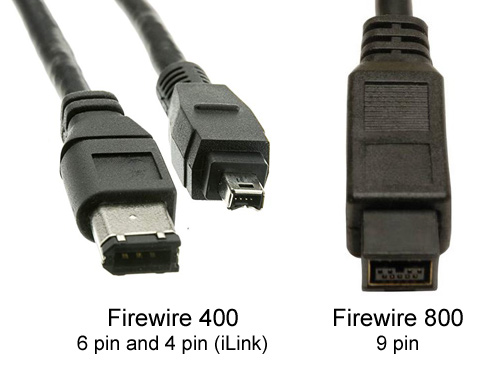
Basically, there are 3 different types of Firewire connector:
- Firewire 400 6-pin connector. Two of the pins are used to provide a power supply.
- Firewire 400 4-pin connector. Also called iLink. Omits the two power pins. The connector is much smaller and is used on most DV and HDV video cameras.
- Firewire 800 9-pin connector. A later development with a faster bitrate.
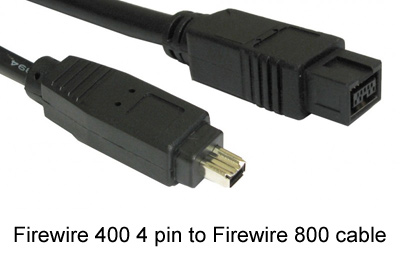
DV and HDV video cameras usually have the small Firewire 400 4-pin connector. The Firewire cable they usually ship with therefore has a Firewire 400 4-pin male plug at one end that plugs into the camera. The other end of the cable might have any of the three types of Firewire male plugs which would plug into the Firewire socket on your computer if it had one. Obviously the plug must match the type of the computer’s socket otherwise you would have to buy an adapter to convert between the two types (or buy a whole new cable with the compatible connector types at both ends).
Of course in our case, there is no Firewire port on our computer, and we are instead plugging the cable into the Firewire 800 socket of the Apple Thunderbolt to Firewire adapter. So if our camera has a Firewire 400 4-pin port, then our new cable must have a Firewire 400 4-pin male plug at one end (plugs into the camera) and a Firewire 800 male plug at the other end (plugs into the Apple Thunderbolt to Firewire adaptor). If the cable that came with your camera matches that, then you are all set, otherwise you will have to purchase a new cable of that specification – this shouldn’t be a problem, as Firewire cables with various combinations of connector types at either end are still readily available online, and are relatively inexpensive. But, if you really can't find a cable that has the correct plugs at both ends, then you may just have to settle for a cable that only has the correct Firewire plug at one end, and buy an additional Firewire adaptor that fits onto the ‘incorrect’ end of the cable – you should be able to find cheap adaptors that convert between any of the three Firewire connector types.
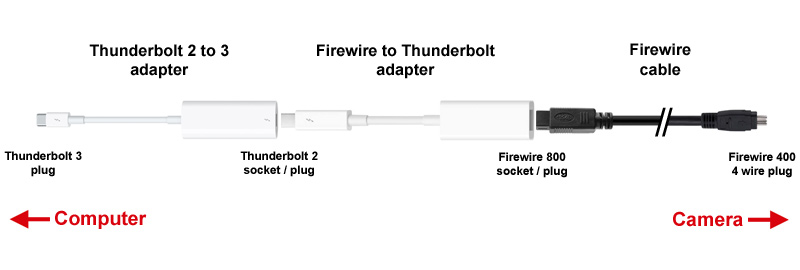
Below is a diagram showing how the two Apple adaptors and the Firewire cable are all connected together to form a chain between the computer and the DV or HDV camera. In this case, the camera has a Firewire 400 4-pin socket, so our cable must have a matching Firewire 400 4-pin plug at the camera end.
Approving the Adapters
The first time a peripheral device is plugged into a Thunderbolt port, Windows will ask you to ‘approve’ (i.e. authorize) that specific device before the connection is allowed. You can choose to approve the device for this one occasion, or for all future times it is plugged in. In our case we want to approve the Apple Thunderbolt to Firewire adapter for all future uses, so that we don’t have to approve it every time we plug it in.
So, follow this procedure to approve the Apple Thunderbolt to Firewire adapter:
1. Make sure that the Administrator account is enabled on your computer (it is usually disabled by default on Windows 10 and 11). To enable it follow these instructions:
- Open a command prompt as an administrator by typing cmd in the Windows search field.
- From the results, right-click the entry for Command Prompt, and select Run as Administrator.
- At the command prompt, type “net user administrator” (without the quotes of course).
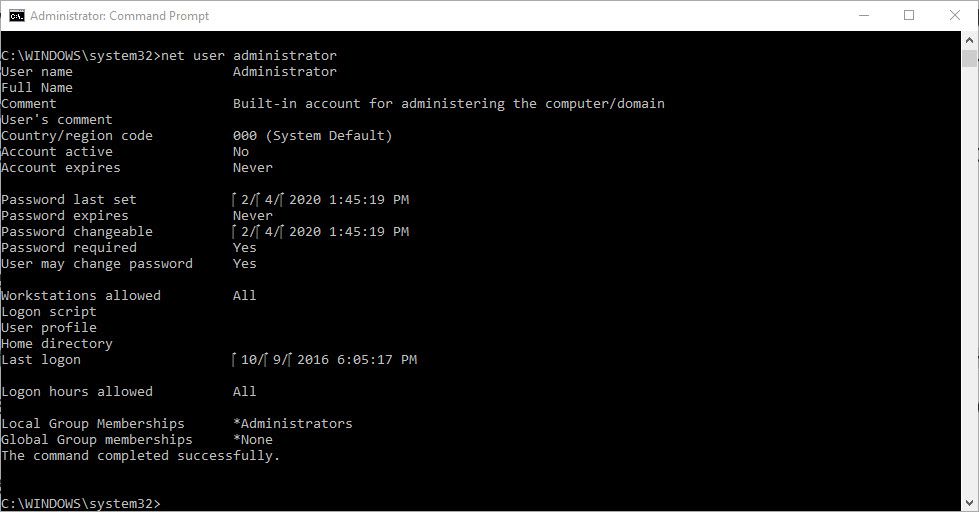
If the value of Account Active is Yes, then the Administrator account is already enabled, and you can proceed to step 2.
If the value of Account Active is No, then follow these instructions to enable it:
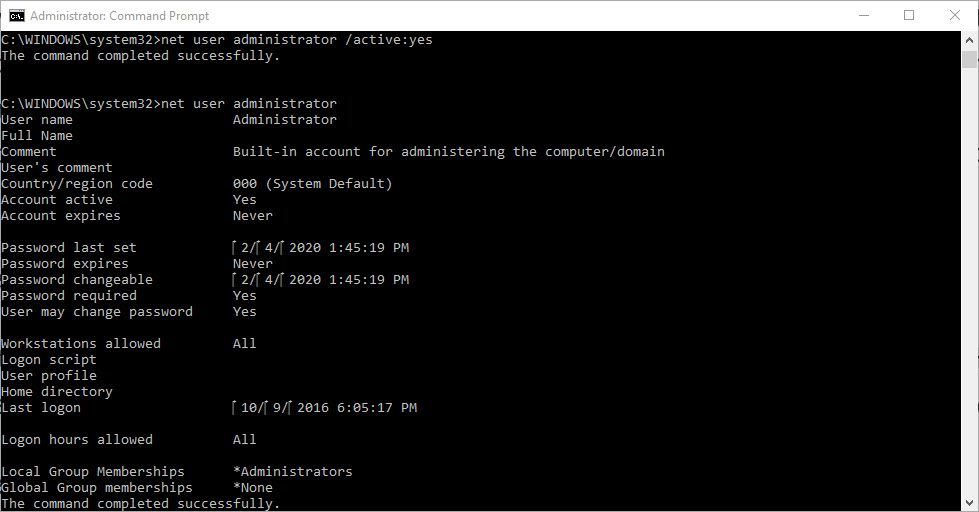
- At the same command prompt, type “net user administrator /active:yes”. You should then receive a response that the command completed successfully.
- Type “net user administrator”. The value for Account Active should now say Yes.
2. Make sure nothing is plugged into any Thunderbolt port on the PC. Better still, unplug everything you can apart from the display, keyboard and mouse.
3. Make sure no Windows user accounts are logged in – log them all out.
4. Restart your computer
5. Log into an Administrator user account (you must not log into a Standard account).
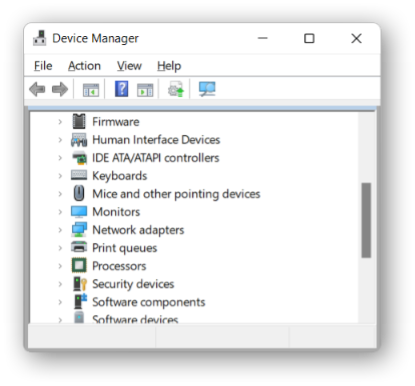
6. Now launch the Device Manager by pressing the key combination Windows + R (hold down the Windows key while you press the R key); then in the Run window that appears type devmgmt.msc and click OK. The Device Manager window should now appear. By default, the Device Manager displays an alphabetical list of device categories; if you click to expand a device category, it will show a list of the names of the actual devices that it can find on the computer.
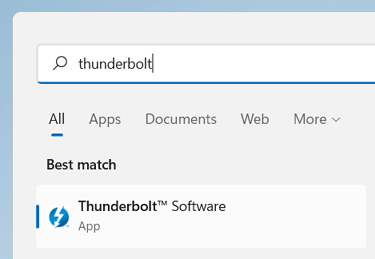
7. In the Windows search bar, type “thunderbolt” and click the “Thunderbolt Software” app that is suggested. An “Attached Thunderbolt Devices” window will appear which displays an empty list.
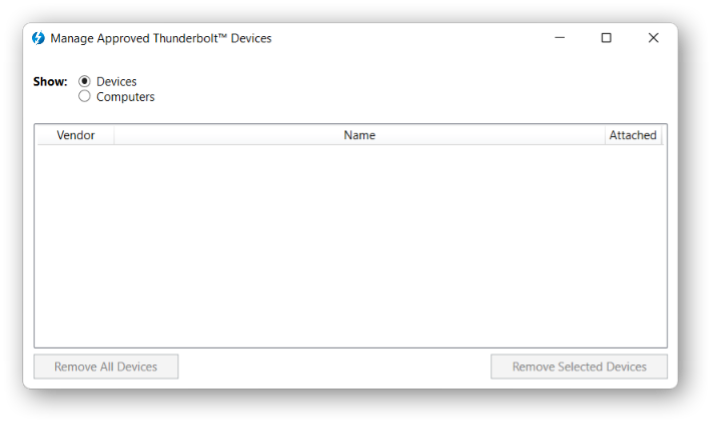
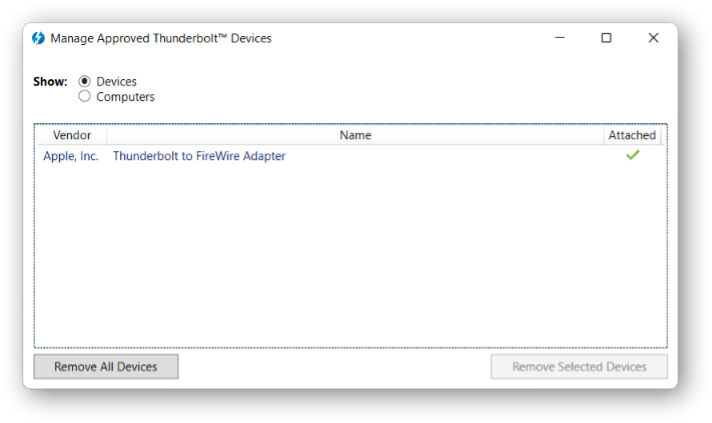
8. Right-click the Thunderbolt Software icon in the Windows Notification Area, and from the menu click “Manage Approved Devices” – this needs to run with elevated privileges so will probably present you with a User Account Control box where you must click “Yes”. The “Manage Approved Thunderbolt Devices” window should now appear which currently displays an empty list.
9. If your computer has a Thunderbolt 3 port, then plug in the Apple Thunderbolt 3 to Thunderbolt 2 adapter. (If your computer has a Thunderbolt 2 port then you can skip this step). Make sure that you plug directly into the port on your computer, not via an external hub or dock. When you insert the adapter, you will probably hear a “device attached” sound and the Device Manager window will refresh but you will usually see no change to its list of devices yet.
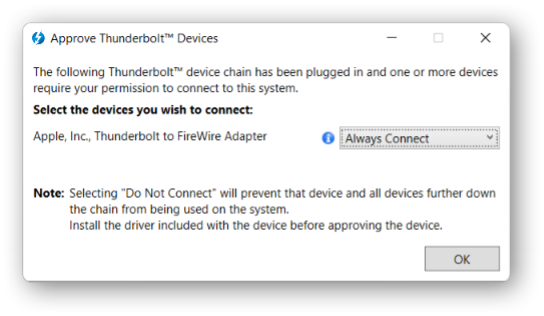
10. Plug in the Apple Thunderbolt to Firewire adapter. This will either be plugged into the Apple Thunderbolt 3 to Thunderbolt 2 adapter (from step 9), or directly into the Thunderbolt 2 port of your computer (if it has one). Make sure that it is not plugged in via an external hub or dock. There will be a “device attached” sound, and after a few seconds an “Approve Thunderbolt Devices” window should appear – in the next step you will use it to approve the Thunderbolt to Firewire adapter for use on your computer.

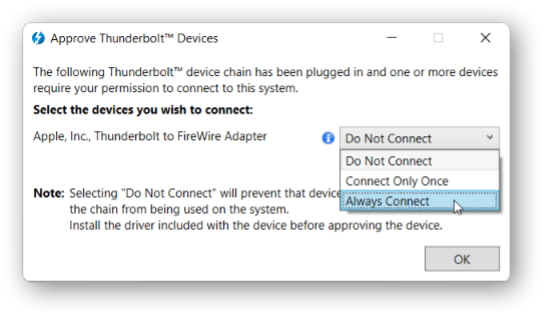
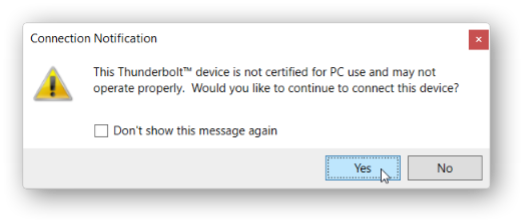
11. In the “Approve Thunderbolt Devices” window you should see the device name “Apple, Inc., Thunderbolt to Firewire Adapter” displayed, and alongside it a drop-down list that allows you to choose how this device will be treated whenever it is plugged-in in future. From the drop-down list choose “Always Connect”. You may now see a Connection Notification window appear that displays a warning message similar to “This Thunderbolt device is not certified for PC use. Would you like to continue to connect this device?” – just click the Yes button. Make sure that the drop down box now says “Always Connect” and click the OK button.
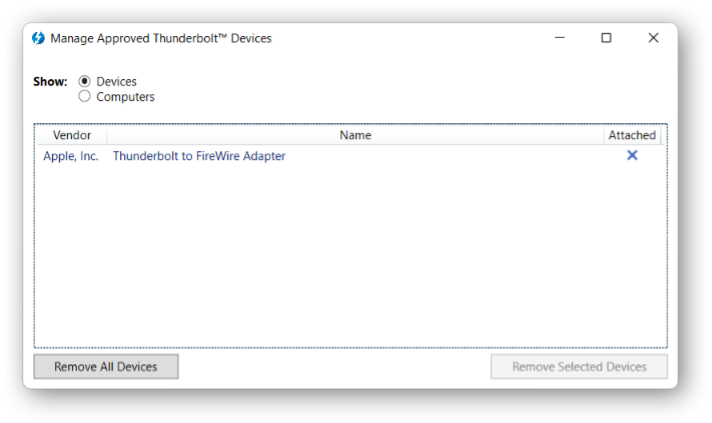
12. The “Manage Approved Thunderbolt Devices” window should now be displaying an entry for the “Apple Thunderbolt to Firewire Adapter” with a green tick in the Attached column. Also the “Attached Thunderbolt Devices” window should now display details of the adapter.

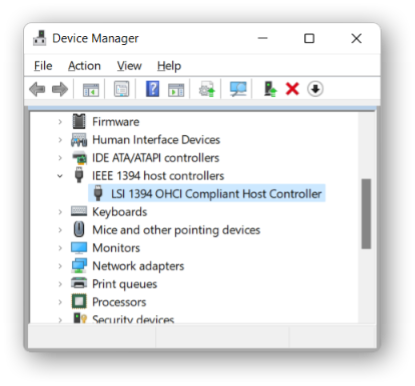
13. You will also see that the Device Manager window now has a device category of “IEEE 1394 host controllers”, with a device name “LSI 1394 OHCI Compliant Host Controller” (IEEE 1394 is basically another name for Firewire). Under “System devices” you should also see a device name similar to “Thunderbolt(TM) Controller – 15D9”.
14. Log out of the Administrator account, and log into your Standard account.
15. Finally, for security reasons, you should now disable the Administrator account unless you have a specific reason to keep it enabled. You can disable the Administrator account by following these instructions:
- Open a command prompt as an administrator by typing cmd in the Windows search field.
- From the results, right-click the entry for Command Prompt, and select Run as Administrator.
- At the same command prompt, type “net user administrator /active:no” (without the quotes). You should then receive a response that the command completed successfully.
- Type “net user administrator”. The value for Account active should now say No.
Congratulations! The Apple Thunderbolt to Firewire adapter is now an approved device on your computer, and you should not need to repeat the above steps again.
The device approval should survive future logouts and computer shutdowns.
Whenever you want to connect the adaptor to your computer in future, it’s a good idea to open the Device Manager and “Manage Approved Thunderbolt Devices” windows on screen (see instructions above) because they can be useful for diagnosing connection problems if they occur.
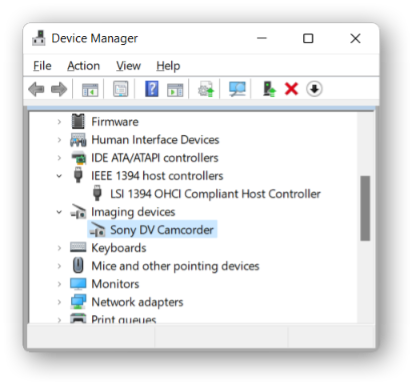
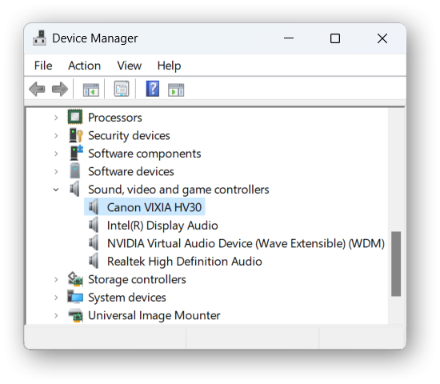
You can now plug your Firewire cable into the Apple adapter and your DV or HDV camera, and launch your chosen DV or HDV video capture software. When you power-on your camera in “Camera” or “VCR” mode you should see your camera appear in the Device Manager window: if is a DV camera it will appear in the “Imaging devices” category, and if it is an HDV camera it will appear in the “Sound, video and game controllers” category.
You will then be able capture DV or HDV video from it. If your capture software has tape transport buttons in the software window, you should find that these also work to play, pause, fast-forward, and rewind the tape.
If the camera is not detected when it is powered-on and fully connected, or the Firewire adaptor is now disabled (as displayed in the Device Manager and “Manage Approved Thunderbolt Devices” windows), then you may have to keep the Administrator account enabled during your complete DV/HDV capture session. Step 1 above tells you how to enable it again. But when you are finished capturing from tape, remember to disable the Administrator account again (see step 15 above). If you are especially security conscious, it is a good idea to disconnect your computer from the internet while the Administrator account is in its enabled state.
Next time you restart your computer
The device approval should survive future logouts and computer shutdowns, so you should be able to just log in, plug in the adapters, start up your video capture software and off you go!
However, on some computers, if the Apple adapters are disconnected and re-connected again, or if the computer is restarted, then the computer may not be able to detect the adapters again – you can see if this has happened because the IEEE 1394 entry remains missing from the Device Manager window, and the “Manage Approved Thunderbolt Devices” window is empty or displaying an “X” in the Attached column.
If this happens, you have to give it an extra ‘nudge’ to make it detect the adapter properly. The ‘nudge’ is simply to close the “Manage Approved Thunderbolt Devices” window, then re-open it again (see step 8 above). After a few seconds the IEEE 1394 entry should appear in the Device Manager window, and the “Manage Approved Thunderbolt Devices” window should have a green tick in the Attached column – if not then unplug the adapter from the computer, wait a few seconds, then plug it in again, wait another few seconds, and then do the ‘nudge’ again. If that doesn't work, then try connecting the adaptors one at a time; wait a few seconds for the adaptor to be detected before plugging in the next.
If the adaptor still isn't detected after a couple of nudges, then you may have to keep the Administrator account enabled during your complete capture session. Follow step 1 above to enable the Administrator account, then unplug the adapter from the computer, wait a few seconds, then plug it in again. When you are finished capturing from tape, remember to disable the Administrator account again (see step 15 above). If you are especially security conscious, it is a good idea to disconnect your computer from the internet while the Administrator account is in its enabled state.
Whenever you restart your computer, it’s a good idea to open the Device Manager window and the “Manage Approved Thunderbolt Devices” window (see steps 6 and 8 above) and leave them open while you are capturing video, because they can be useful for diagnosing connection problems if they occur.
Further Tips
If after following the above instructions the Firewire device is still not displayed in Device Manager, try the following:
Some guides for getting Thunderbolt ports working advise you to update the BIOS if possible. If you want to do this, make a note of the current BIOS version on your computer, then go to the product support section of your computer manufacturer’s web site and search for the model number of your specific computer. If it displays a support page for your model (sometimes there isn’t an exact match) look among this list of available downloads for a BIOS file and compare its version number with the current version number you noted earlier. If the one on the web site is newer, download it and follow its installation instructions. Then run through the “Approving the Adaptors” procedure again.