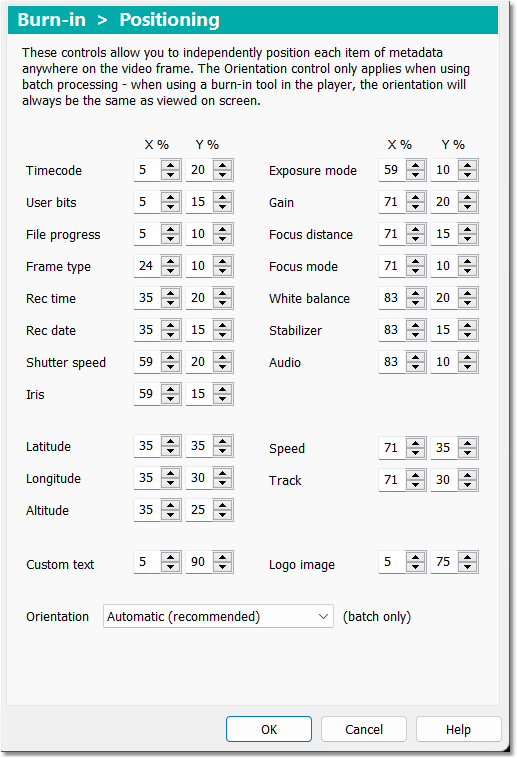
On the Burn-in > Positioning options page there is a set of spin controls for each metadata item that allows you to set their position horizontally (X%) and vertically (Y%) on the video frame.
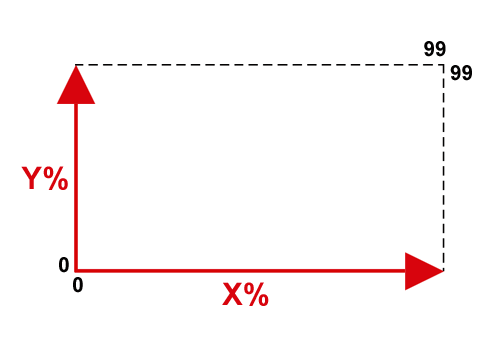
The X% values go from 0 at the far left of the video frame, up to 99 on the far right of the frame. Similarly, the Y% values go from 0 at the bottom of the video frame, up to 99 at the top. So X%=0 Y%=0 is at the bottom-left, and X%=99 Y%=99 is at the top-right.
In practice, stick to a maximum value of approximately 95 or less, because with higher values the text is likely to bleed off the top edge or right edge of the frame.
The X and Y positions are expressed as a percentage of the video width and height. This is because the pixel dimensions of the video frame can vary widely depending on the video format, so using percentages rather than pixel dimensions allows us to be more consistent with size and positioning.
As an example, a frequent requirement is to burn-in only the recording date and time using the Burn-in Time Stamp tool. By adjusting the X% and Y% values for the Rec time and Rec date items, you can position the date and time anywhere in the video frame, using any font and text size that you wish.
The separate group of controls near the bottom of the Positioning page are used to set the position of the GPS Geotagging items. These only apply to AVCHD, GoPro, Insta360 or Contour video cameras and smartphones that are equipped with GPS units. They also apply for Sony AVCHD cameras when they are set to standard definition mode and create MPEG-2 PS files.
The Custom text control sets the position of a user-provided text string, and Logo image sets the position of the bottom-left corner of a user-provided image file - see the Options - Burn-in Appearance section below for more details.
The Orientation control only applies when you are using a Burn-in operation in Batch Processing, and is primarily intended for use with MP4 and MOV video files created by some smartphones and tablets that contain orientation information about which way up the camera was held when the recording was made. The Orientation conrol allows you to override any wrong or missing orientation information in all of the files in the batch file list, by rotating the whole burned-in text layer in 90 degree increments. You can set this control to any of the following orientations:
Automatic (recommended) - this sets the orientation of the burned-in text to match the orientation information (if present) in the input video file.
Landscape - regular landscape orientation.
Landscape 180° - upside-down landscape orientation.
Portrait 90° CCW - portrait orientation, rotated 90 degrees counter-clockwise.
Portrait 90° CW - portrait orientation, rotated 90 degrees clockwise.
The Automatic setting will try to choose the correct orientation for the burned-in text if the file contains orientation information; otherwise it will use regular landscape orientation which is how video is usually shot. The other 4 settings allow you to set a specific orientation manually.
The vast majority of correctly-shot video will be in landscape orientation, so you should leave the orientation set to Automatic. Only choose one of the other 4 manual settings in exceptional circumstances, such as when the camera was held vertically (i.e. in portrait) but it did not store any orientation information in the recorded video file.
Note that the Orientation control does not apply if you are using a Burn-in tool from the Tools menu. In order to use the Tools menu, the file will already be open in the player window, so it is much easier to visually check and correct the orientation in the player window and then use the Burn-in tool from the Tools menu - that will ensure that the burned-in file will have the same orientation as the image you see in the player window. This is explained further in the Burning-in Portrait Oriented Video topic.
For more details about portrait and landscape orientation and how this is handled in DVMP Pro, see the Portrait Oriented Video topic.
When you first start DVMP Pro, a set of Positioning settings is automatically selected to get you started. You can then adjust them to suit your requirements.
When you are experimenting with positioning, choose a very small file to burn-in, then you won't have to wait long to see the results.
See Also: