How to time stamp MOV and MP4 video files with DVMP Pro
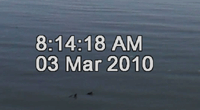
One of the most frequent uses of DVMP Pro is to time-stamp MOV and MP4
files that were recorded by video cameras (and some smartphones), so this tutorial steps you quickly through all you need to know if you
just want a date and time stamp to be permanently overlaid on your MOV and MP4 video files.
And you can do this on Windows 10, Windows 8/8.1 and Windows 7.
You can also time stamp other file types such as
AVCHD,
MOD,
Sony HDD (hard disk drive),
HDV and DV, and there are
separate tutorials available for some of these - just click one of the file types to jump to the corresponding tutorial.
This tutorial is for time stamping MOV and MP4 video files.
Please note that MOV and MP4 are general file containers that can be created by a huge number of
devices and software, not just by video cameras/camcorders. Beware that some of these devices and software do not store
the date and time in a reliable manner, in which case the time-stamp will be unreliable too! The only way to know if your
video camera stores the date and time reliably is to shoot a video clip at a known date and time, then time-stamp the clip
and see if the stamped date and time is different. DVMP Pro only supports MOV and MP4 files created by camcorders, and most
smartphones and POV cameras.
The tool which does the time-stamping in DVMP Pro is called the Burn-In Time Stamp
tool because "burn-in" is the technical term for writing information
permanently across video frames - and that's exactly what time-stamping does.
DVMP Pro can also stamp (or "burn-in") lots of other info onto camera video files,
and if you want to know more about this see the
Burn-in Metadata
section of the online help and the corresponding
options
for all of the detailed info.
But in this tutorial we are just keeping it simple and showing you how to time-stamp your files.
In most cases you will probably want to time-stamp several files in one go, and you can do this
by using DVMP Pro's "Batch Processing" window. So let's begin by starting up Batch Processing ...
1. Start up Batch Processing
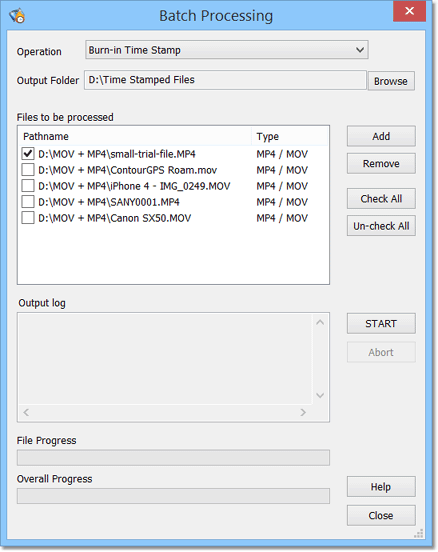
Start up DVMP Pro, and click the menu File > Batch Processing. The Batch Processing window will then
appear
Batch Processing can be used for several purposes, so we need to select which operation we want. In the Operation
drop-down choose "Burn-in Time Stamp".
Now we need to select the output folder where all of the time-stamped files will be created. So click the Browse button
and the Select Folder dialog box will appear - choose the output folder (create a new folder if you want) and click the Select Folder
button.
Now we can add the input video files to the list of "Files to be processed". We can do that in two ways. Click the Add button and use
the file selection dialog to choose each file. You can select multiple files by Ctrl-clicking, and ranges of files by Shift-clicking.
Then click OK and the files will be added to the list. You can then click the Add button again to select more files and they will be added
to the end of the list.
The second way of selecting the input files is simply to click-and-drag the files from File Explorer or Windows Explorer and drop them
onto the Files to be processed list box. The dropped files will be added to the bottom of the list.
Remember that all of the input video files must be "camera-original" (i.e. files copied directly from the camera without any further
processing). The vast majority of video processing software does not understand the time information in camera video files. Consequently,
if a file has been though any form of processing, filtering or transcoding, then the software that performs that processing will have
thrown the time information away - so its output files will contain no date or time information. This is why only camera-original files
are supported by DVMP Pro.
If any of the files that you try to add to the list is not supported by DVMP Pro, they will not be added to the list and an error message
will tell you how many files have been rejected.
You can change the order of the files in the Files to be processed list simply by clicking and dragging a file and dropping it at the new position.
You can Ctrl-click or Shift-click to select several files to be dragged.
If the list contains lots of files, you can drag to the top or bottom of the list and it will automatically scroll up or down.
If you want to remove one or more files from the list, click (or Ctrl-click or Shift-click) to select the file/s, then click the Remove button.
If you want to remove all of the files from the list, just click anywhere in the list then press Ctrl-A to select all of the files, then click
the Remove button.
If there are any files in the list that you do not want to be time-stamped (but you prefer to leave in the list for now) then just un-check the
check box to the left of the file name.
2. Choose the settings
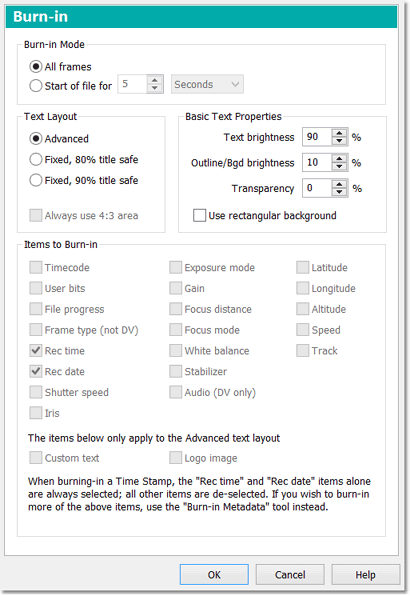
OK, now we have got the Batch Processing window ready with a list of input camera files, we can now move on to
choose how we want the time and date stamp to appear on the video frames.
In the main DVMP Pro window, click the menu Tools > Options and click Burn-in in the left-hand
pane. The Burn-in options page appears with a set of controls that we will
quickly run through.
In Burn-in Mode, select All frames.
In Text Layout, select Advanced.
Basic Text Properties lets you set the brightness of the date/time stamp text
and the brightness of the text outline - 100% is brightest white and 0% is
darkest black. You can also set how transparent you want the text to be - 0% is
completely opaque and 99% is almost completely transparent. To begin with, set
them to 90, 10 and 0 respectively.
Ignore the
Items to Burn-in which are fixed and unchangeable for time stamping. The Rec date and Rec time will
always be shown checked - these items mean the date and time that the video files were recorded by the camera.
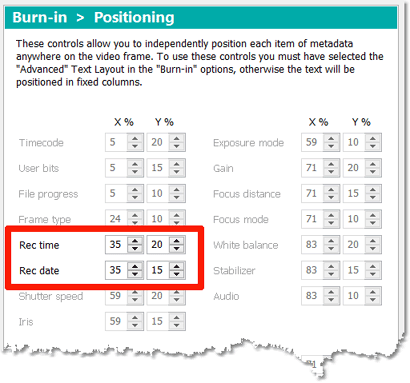
Now click Positioning in the left-hand pane. This page contains a set of
controls for setting the position that the date and time stamp text will appear on the
video frames. Ignore all of the items on this page except the Rec date
and Rec time items.
The X% value gives the horizontal position of the date or time stamped
text. 0% is the left hand edge of the frame, increasing to 99% at the right hand
edge of the frame. The Y% value gives the vertical position of the text,
where 0% is the bottom edge of the frame increasing to 99% just beneath the top
edge of the frame.
Set the X% and Y% values for the Rec date and Rec time items -
this will be a first estimate at present.

Now click Appearance in the left pane. This page allows you to set the
font, text size and bold/italic properties of the stamped text. You can also
choose which language you want the date and time to appear.
In the Rec date/time locale drop-down list, choose the required
language/locale (or just leave it as your native locale).
Choose the Font and Text height - note that the text height is
expressed as a percentage of the frame height. Also select bold and/or
italic if needed.
If you want fine control over how the date and time text is formatted, check the
Custom rec date and Custom rec time boxes, and then type a
formatting string into the edit box beneath. The formatting string can contain
ordinary text and several formatting codes which control how the elements of the
date and time will appear. See this section of the online help for a list of these
formatting codes and some example formatting strings.
As you type the formatting string, some example text appears beneath showing you
what the date or time stamp text will look like, with the formatting codes expanded.
Also if you change the font or the Rec date/time locale, the example text will
change to show you what the date/time stamp will look like in the chosen font or
language.
As we are only interested in doing a simple time-stamp, just ignore the Custom text and Logo image file
boxes for now.
3. Choose the output file type
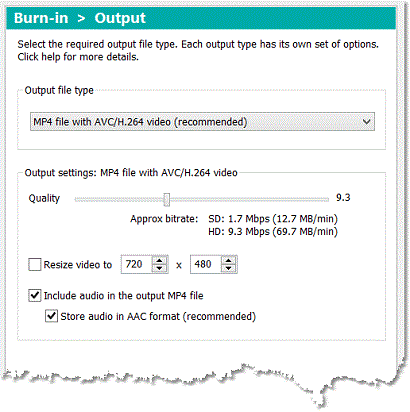
Finally, click Output to choose which output file type we want.
You can choose from a list of file types with video compression formats, and each has
its own set of options that you can adjust.
We recommend that you always leave the default "MP4 file with AVC/H.264 video"
selected unless you have a compelling reason to use one of the others instead.
MP4 file with AVC/H.264 video is usually the best choice because it benefits from
the QuickSync hardware acceleration that is built into most Intel-based computers, so
time-stamping will usually complete much faster than with the other output file types.
Also the files are comparatively small (handy for sending to clients), and very well
supported by other video software, so you should have no problems importing your
time-stamped files into most video editing and DVD authoring software.
If you want to experiment with other output file types, you can find out
more details here.
But in this beginners tutorial we will just tell you to
leave "MP4 file with AVC/H.264 video" selected.
You can use the slider to choose the Quality setting that you want. The greater
the value on the slider the better the video quality, and the bigger the output file.
If you wish, you can also check the Resize video to box and set a new pixel
width and height for the output file. Also, check Include audio in the output
MP4 file if you want the date/time stamped file to contain audio. Un-check it if
you only want it to contain the video frames without any audio (i.e. silent).
If you check Include audio in the output MP4 file we recommend that you also
check Store audio in AAC format which ensures that the audio format will be in
AAC format. Basically, MP4 files with AVC/H.264 format video and AAC format audio is
one of the best combinations for importing into other video software.
We can now proceed to time-stamp our camera video files.
4. Time stamp the files
In the previous steps we set the required position and size of the time-stamp
text, and chose the type of the output file. So we are now ready to actually
time-stamp a file.
To begin with, choose just one small mts (or m2ts) file to be time-stamped - just
a few seconds in length will do. Leave that file checked, and un-check all of the other files
in the list. That means you will be able to see the results
quicker and decide whether you need to change any of the settings that were
discussed above.
Now click the START button.
A Confirm Settings for Time Stamping
box will appear that contains the same settings as we already set above. If you
wish, you can change any of these now. If you have forgotten what these settings do, look
at Choose the Settings above for a reminder.
Click OK to accept the settings.
The time-stamping now begins. The Overall Progress bar shows the progress through the whole stamping operation,
and the Output log pane shows progress messages for each file as it is time-stamped. The contents of the
Output log pane will also be found in a Batch-log.txt file in the Output folder that you chose earlier.
When the time-stamping operation completes, the Output log pane will show how many files have been processed, and
if any have failed for some reason. If there are one or more failures, scroll back through the Output log to see
if there are any explanatory error messages.
The time-stamped files will be found in the Output folder and will have the same file name as the
input camera-original video files, except that "-burn" is added to the end of the name (e.g. myfile-burn.mp4).
If you had checked the Store audio in AAC format check box, and the Output log contains error messages
about a missing AC-3 audio decoder, this means that your computer does not currently have an AC-3
audio decoder installed on it. You can easily remedy this - see these instructions for
AC-3 Audio Decoder Recommendations.
Play the stamped MP4 file in a media player of your choice, for example Windows
Media Player, VLC or Media Player Classic Home Cinema. Don't try to open a stamped file with DVMP Pro because
DVMP Pro only plays camera-original files - time-stamped files are obviously not camera-original.
Press pause in your chosen media player, and examine the position, font, size, style etc of the burned-in time stamp text.
If you feel that any of these need to be changed, close the media player then return to DVMP Pro and change
the required settings, and then perform another time-stamp by clicking the START button again.
Repeat this until you have the required results.
If the camera's clock had been set wrongly or you had changed time zones when the recording was made, then you
may find that the time-stamped date or time is incorrect. In that case you can easily adjust it to the correct date and time by going to
Tools > Options > Metadata Sources and check the
Adjust Date and Time option.
Then use the spin controls to add or subtract the required
number of hours, minutes, seconds, days, months or years - whatever brings the date and time to the correct values. Next time
you perform a time-stamp, all of the files in the file list will have this adjustment applied to them. It's always a good idea to check
the date and time setting on your camera before you make a recording, but if you forget then the Adjust Date and Time feature is
always there to come to your rescue.
When everything looks OK, tick the check-boxes of all of the files in the
list that you want to time-stamp and click START for your final full time-stamp operation.
Time Stamping smaller sections - a great time-saver!
Using the Batch Processor as described above is fine if you have lots of video files and
you want them all time-stamped.
However, sometimes you may have a lengthy video file but you only need a
small section of it to be time stamped. It would be quite frustrating to wait for
the whole file to be time stamped when you may only need a few minutes or just a few seconds
of it.
 To do this, open the camera-original video file in DVMP Pro using the File > Open menu.
Press the Pause button to stop playback, then drag the slider until you reach the beginning of the section you are interested in - use the left and right cursor keys to step to the exact frame if you like. Then press the open-square-bracket key [ which marks
this frame as the In point of your selection. Then drag the slider to the end of the section you want and press the close-square-bracket ] key which marks that frame as the
Out point. The selected section is highlighted as a green bar on the slider. To do this, open the camera-original video file in DVMP Pro using the File > Open menu.
Press the Pause button to stop playback, then drag the slider until you reach the beginning of the section you are interested in - use the left and right cursor keys to step to the exact frame if you like. Then press the open-square-bracket key [ which marks
this frame as the In point of your selection. Then drag the slider to the end of the section you want and press the close-square-bracket ] key which marks that frame as the
Out point. The selected section is highlighted as a green bar on the slider.
To time stamp just the selected section, click the Tools > Burn-in Time stamp menu, confirm the settings, and choose the output file name and folder.
Time stamping will then proceed. The output file will contain time-stamped video
for just your chosen section, so the time stamping will complete much faster than
time stamping the whole file.
This is obviously a real time saver!
Additional Notes
Please note that the Batch processor will never overwrite any existing files, so each time you run the
time-stamp operation, if the output file names already exist then the new time-stamped files will have a
numeric suffix added to end of their file names to make them unique. Consequently, if you need to repeat the time-stamp operation
several times, keep an eye on the contents of the output folder as it will quickly fill with old time-stamped
files - so delete the old time-stamped files if necessary to make room for the new ones.
If you only want to time-stamp a single file, then you can do this from the Tools menu (instead of in Batch Processing) by opening
the camera-original video file by clicking the File > Open menu. The file will then begin to play. Then click the menu
Tools > Burn-in Time Stamp.
For more detailed help on how to time-stamp camera video files, see the following sections of the online help:
For more details of how to use Batch Processing see the following section of the online help:
|


